Thursday, January 26, 2012

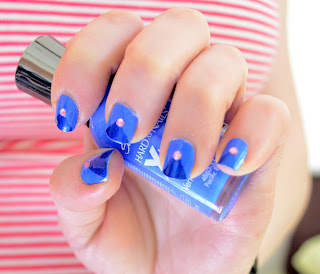
Triangle & Crystal Nail Tutorial.


Here's what you'll need: A top coat (I use Sally Hansen Dries Instantly, dries in about 30 second), feature colors for your triangle, a base color, crystals, tape, & a head pin/toothpick. Go wild with picking out colors, I went with blue and pink because blue is my boyfriend's favorite color and pink is mine.

First, prep for your manicure, to make it last longer. Remove your old polish, if any, and soak your hands in warm water for a few minutes. Trim your nails and push back your cuticles. Do not use lotions or oils on your hands, it may make the dry time longer.

Before you start made ten 1" pieces of tape and but them in half making 20 pieces.  You can do that after you put your base cost on but its nice to have everything ready before you start.

All I used, I skipped the glitter polish on this one though.
 I was going to add glitter but decided it looked find without.
Pacific Blue by Sally Hansen.
 Apply the base, I applied 2 coats. You may want to do more depending 
on the color and brand of polish you use.
Let the base dry completely before putting on the tape.
 Once the polish is dry place one strip of tape crossways, make sure to press down firm.
Apply a second strip of tape across the opposite way.
This is what it will look like after.
You can also flip the tap and have the triangles at the base of your nails.
Apply one or two coats over the tips of your nails.

Peel off the tape and let it dry. Sally Hanson Blue It.
I used my top coat as glue. I put poured some on a piece of tape.
 You can use nail glue or super glue and put it right on the nail. I like using my top coat, looks cleaner at the end. For the crystal you can get them at a beauty supply store or order them online. You might be able to find some kind of flat crystal at a crafts store.
I used a head pin to pick up and place the crystal.
 Use you pin or toothpick pick up the crystal. Dip the end in the top coat or glue then pick up the crystal while it is still wet, dip the crystal in the top coat or glue then place it on the nail. I placed mine at the point of the triangle but you can place it where ever you'd like. Try to do this step quickly so the crystal doesn't dry on the end of the pin or toothpick.
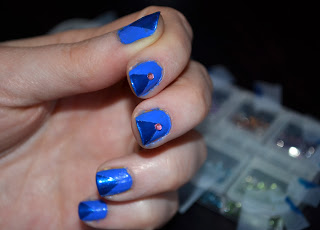
While they are still wet you can move them if needed.
Again, try to be fast so that it doesn't where you don't want it to.
Side view :)
Haha, you can see where the tape was!
Put on your top coat.
 And that is it, all done!
You can clean up around the nail if you got any polish on your skin with nail polish remover or wipe it off in the shower like I do. Warm water is great for getting polish off the skin :)
Sorry most of my pictures were so dark.
Thank you for stopping by & let me know if you give it a try. 

Monday, January 9, 2012

How to make a simple chain and stone necklace.


I recently picked up some really nice dragon vain agate and sea sediment jasper, I was going to make some crazy necklace or bracelet but they were so nice by themselves that I wanted to just do a simple necklace. I also thought I'd share how to make such a simple necklace that only takes a few minutes to make!

What you need:wire cutters

  •  round & flat jewelry pliers
  • wire cutters
  • beads or pearls
  • length of chain
  • 24 or 25g wire
  • clasp & jump rings 
*The chain I used has open links, if the chain you are going to use does not have open links wrap the loops you made on the chain as you make them. 
A few things you will need.
 I went with the gold tone brass but will make the other stones 
with the sterling silver from the pictures later.
Start by threading the wire in the bead.
You can cut the size of wire before you start but I like to cut
as I go so I don't waste any wire and to make sure I have enough.
Use the needle nose pliers to make a circle.
 Leave extra on the end so you can wrap the wire around, if 
there is a snag on the necklace it will be harder for the wire to 
become undone if wrapped around a few times.
Use you needle nose pliers to round out the loop you made.

Also press down all any wire sticking up so it doesn't scratch
you while you wear the necklace. I like to make sure the wire it 
tight enough to fit in the drilled hole on the stone.
One side down.

I wrapped the wire 1.5 times.
Cut the wire.
 I measured 2 finger width, it gave me more then enough
room to work with.
Wrap around again and press the wrap tightly with flat pliers.
Wrap around the same numbers of times & round off the
loop again.
Cut off the extra wire.
Press down the little bit that you couldn't cut off.
If it is a tight fit the wrapping should hide in the stone.
It's fine if the wrapping shows, make sure that you did the
same number of wraps just in case it does show.
Next, start on adding the chain.
The chain I used links aren't soldered so I can
just open the links to add it to the stone.
Lightly and slowly open a link.
Don't twist too hard when you open the links. It will made the
weak and easy to break later if not gently opened.
Slip one loop on the open link.

With the flat pliers close the link shut tightly. Use can
use a little jewelers glue also to keep it closed.
One side done.
 Do the same to the other side.
Have your clasp ready.
I have 2 different styles to the ones I made today
Measure the chain to the size you want.
 The one pictured is 17.5 inches long.
Open a link like before.
 Slip a jump ring one end and the clasp on the other.
Close all links tight and try it on to see if it need any adjustments.
That's it! You're done! I will probably be making more of this necklace next week with different stones and metals and listing them in my Etsy shop. Stop by if you'd like one!
Sea sediment jasper gold tone brass necklace. 17" long.
 I love how this one came out!
Dragon vain agate gold tone brass necklace. 17.5" long.
 I made this one a little longer because the stone is wider.
Thanks for looking, let me know if you give it a shot!
Or if you have any questions!

*** Update***
I made some with silver chain!

I added a small charm!
 The jasper on the silver necklaces are off centered so the
charm hangs in the middle. I also added faceted new jade
to the sides of the jasper.

It looks great on!

I added faceted pink cherry quartz to the sides of the jasper.


Friday, January 6, 2012

How To Have Night Sky Glitter Fade Nails

This look is fast and easy.

Here's what you'll need: A top coat (I use Sally Hansen Dries Instantly, dries in about 30 second), 2-3 glitters colors or glitter polish, and a base coat of your choice (I use Sally Hansen Blue It).
For this I used like color glitters and a transparent glitter that went over both so it didn't cover or change the color of the other two. You can mix it up and use any glitter you'd like over any base you's like. A nice chocolate base with a pink glitter fade looks really nice too! You can also add little silver stars with a tooth pick and polish or a nail art pen if you go with the colors I did to add a nice night sky touch to it.

First, prep for your manicure, to make it last longer. Remove your old polish, if any, and soak your hands in warm water for a few minutes. Trim your nails and push back your cuticles. Don't use lotions on your hands till after you're done, the oils will make the polish take longer to dry.

On clean nails apply base coat, I applied 2 coats. 
Sally Hansen Blue It.
Apply first glitter color to the tips of nails.
Sally Hansen Strobe Light.
Apply this color heavily at the tips.
Lightly apply next glitter color without applying over the first color.

 Sally Hansen Twinkle Twinkle.
Don't apply the second glitter to the end of the nails.
Apply final glitter, it looks best if its a more transparent glitter.

SinFulColors Pearl Harbor
If you have a transparent glitter apply if over the whole nail.
When you are happy with the fade apply your top coat.
All done!
What I used.

Thursday, January 5, 2012

How To Paint Your Nails With A Pastel Leopard Print

I have recently gone a little crazy with buying polish and playing dress up with my nails.In the past three weeks I think I have bought about 20 new colors and goodies for my nails. I couldn't decide what color I wanted to I did a leopard so I can use a few :)

All that I used.
I love the pastel colors I found!


Here's what you'll need: A top coat (I use Sally Hansen Dries Instantly, dries in about 30 second), feature colors for your spots, a base color, a dark color for outlining your spots (a nail art pen or a nail art polish helps), and a base coat of your choice (I use Sally Hansen Mint Sorbet). Go wild with picking out colors: for a traditional leopard print, try a beige base, a tawny golden feature color, and a dark brown or black outline. Or else go tone-on-tone, with lime green, medium green, and black — or lavender, purple, and black. Or light blue, royal blue, and black. Whatever.

First, prep for your manicure, to make it last longer. Remove your old polish, if any, and soak your hands in warm water for a few minutes. Trim your nails and push back your cuticles.

Base coat, I applied 2 coats.  Sally Hansen Mint Sorbet.

Nail Art Polish for the outline of the spots. SinfulColors Black. 
 I found "SinfulColors Nail Art" polish at Rite Aid and it was only .99. It's nice for the price and thin brush but it is too thick for doing very detail things, the leopard prints are fine because they don't have to be prefect.
Yay, fine tip!
Make unfinished circles or "c" shaped marks on you nail, what ever design you like best for you print.
Cover the nail with the marks till you're happy with the amount of spots.

Start filling in the spots in blob of polish with the colors you picked out.
Sally Hansen Mellow Yellow.
Try to keep the blobs roughly the same size but do whatever you think looks best.
Sally Hansen Bubblegum Pink.
Try to stay in the lines with the colors, you want to make sure you can still see the black.
Sally Hansen Lacey Lilac
Fill in the spots that are left, try not to put the same color of spots next to each other.
Wet n Wild French White Creme.


 I don't really like this white as a base coat but it worked really well for just spots.
Add a glitter coat if you'd like, this glitter is great if you don't want too much glitter to
show but still want sparkles. SinfulColors Pearl Harbor.
 I found this glitter at Rite Aid also, it was $1.99. I love this Glitter!
Finish with a top coat. Wait about 30 minutes before add a coat so it
doesn't make any of the colors run.
You can't see the glitter but it's all done! You can clean up the extra polish on the skin
with remover and a Q-Tip or just rub it off in the shower like I do.
My left hand is useless! I made a big mess when I did my right hand.

And as you can see it is not as neat as when I use my right hand. Oh well! 

Pretty :)