Thursday, August 30, 2012

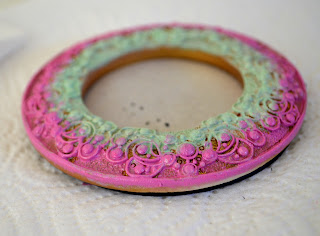
Ombre Inspired Picture Frame Tutorial

Me and my fiance Rob have been together for 3 year next month and in that time we have taken very few pictures together... I could name them all actually since there are about 10. We are both "see threw your own eyes" kinda people it seems so we never think to take our camera or even just pull our phones out. And when we do take pictures Rob usually makes a funny face.

My favorite moment of us trying to take pictures is when we went to La Brea Tar Pits in January and I made a point take the camera to have a picture taken with him. It was my birthday so my little bro Greg came with and while we were walking around I saw a neat tree in a sunny spot and told my brother to take a picture of us. As soon as he said smile I noticed bees in the tree so I looked up! They asked what I was looking at and Greg said he was going to take another. I told them about the bees and told him to do it fast do we can move, as soon as he took the next picture Rob looked up!
I saw bees...
then he saw bees.

My favorite picture(s) of us is from the OC fair  last year when we jumped in a photo booth
Anyway, I had bought two matching frames a few months ago. I had a drawing I did of my Rob in one on my desk already & I wanted to put a picture of us in the other for my desk too but thought the gold was kinda boring so I spiced it up some.
What you will need: 
Paint- 
you will need at least 2 colors & I suggest a white for your base. I used polish because I liked the colors I have more then the paint I have and it dries glossy.
Sponges-
You can use a paper towel or any type of sponge you like. I used a few makeup sponges, You can buy a bag for pretty cheap at  most store. I picked up mine at Rite-Aid for about $2. 
Frames- 
I saw these cute little frames at a crafts store so I got a few.
Maybe Tape-
I did not need to use tape but depending on your project you may have things you need to tape off so paint doesn't get on it.
Start by taking out, off or tape up any thing you don't want paint on.
Apply your white paint to your sponge.
Go around the frame with the white polish/paint. My second color will color the gold with no problems so I just covered enough so my first color will be nice and bright. You can paint white over your whole frame if needed.
Apply as many coats as needed, I have 2 coats. Let it dry or a minute.
Apply your  next color on the sponge.
As you can see in my pictures the gold color started to bleed on my sponge.
Apply over the white.
Let sit for just a min.
On a new sponge apply your second color, you can use the same sponge if you want. I did a few things so I used a few sponges.
Sponge the polish along the outside meeting the green in the middle.
Almost done, let that dry for a min.
Now to bring the colors together!
Start on the color your are you using on the sponge or dab some of the color off before starting so you don't get too much on the color you are covering. Lightly dab over the second color.
I did 2 frames, I really like how this one turned out :)
Once you are happy with the frames let them dry for a min then add your pictures!
  Add your pictures and you are done!
 And my frames go in front of my pin board, done and done!

 Thanks for having a look, hope you enjoyed and found it useful!

Check out my new shop!

Thursday, August 9, 2012

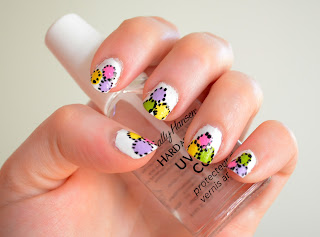
Patch Up Your Nails Tutorial

Here's what you'll need: A top coat (I use Sally Hansen's Top Coat), base color, "patch" colors (I used 4 colors), nail art pen/polish/ or polish with toothpick/dotting tool for the stitches.

First, prep for your manicure, to make it last longer. Remove your old polish, if any, and soak your hands in warm water for a few minutes. Trim your nails and push back your cuticles but don't cut them. Do not use lotions or oils on your hands before you start, it may make the dry time longer.
Start by applying your base color, I used 2 coats of a french white tip white. 
This look is also pretty cool on a nude nail if you feel like skipping the base coat.
Make 3 dots on your nail leaving some white along the bottom, mix up the colors on each nail.
With your "stitch" polish make a few stitches completely around each dot.
Continue until each patch has been properly stitched in :)
 Apply your top coat and you are done!

Thanks for taking a peek, hope you enjoyed.
If you give it a try feel free to come back and share!

Tuesday, August 7, 2012

Nail Art Tape & Sequins Tutorial

Nail Art Tape & Sequins Tutorial
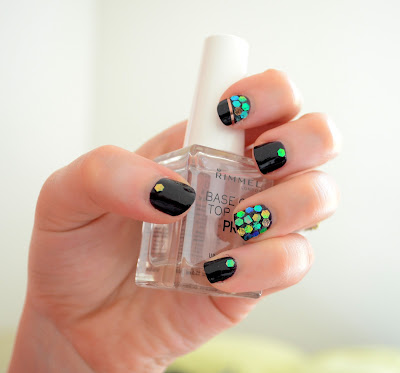
 I've seen this look a few times and every time I kept thinking I have that glitter, I should do that! I haven't done anything with my nails for about two weeks so I thought now is the time to do the sequin nails, I have put it off enough!
I gave it a try and I am very happy with how it came out, my ring finger is a little messy but I still like it.

Here's what you'll need: A top coat (I use Rimmel Base and Top Coat), base color, sequins glitter, & nail art tape.
First, prep for your manicure, to make it last longer. Remove your old polish, if any, and soak your hands in warm water for a few minutes. Trim your nails and push back your cuticles but don't cut them. Do not use lotions or oils on your hands before you start, it may make the dry time longer.
 Apply one or two coats of your base color. 
*I waited till it was dry to apply the glitter but next time I will try it while still wet.
With a little clear polish on your toothpick pick up a piece of glitter.
 Apply the glitter to your nail.
*As you can see in my picture it is starting to get messy. I put some clear polish on my nail and picked up the glitter with more clear polish. I think if the polish was a little wet still it would have come out better since I would be using less clear. Either start while still wet or apply a coat of clear before I start.
 Continue adding sequins until you are happy with the look. If any sequins is longer then your nail just gingerly trim it with your nail clippers.  
Apply half of your index finger with glitter.
 Cut off some tape from your roll. Apply one end as close as you can to the edge of your nail and trim the other side.
 Add one glitter to the bottom of you nail beds.
Apply your top coat and you are done!

Hope you enjoy, feel free to come back and share if you give it a try!


Like it? Pin it!

Friday, August 3, 2012

Juniper Berry & Peppercorn Rubbed Pork Loin Recipe

When my best friend/cousin and I were both single and had more time on our hands we use to get together at his place on weekends to try to cook new things... Truth be told we use to look at thisiswhyyourfat.com for inspiration. Our best experiment was a bacon wrapped meatloaf, it was the best I have ever had. I am still kicking myself 5 years later for not writing down what we used and how much for that meatloaf. Anyway, we decided that we needed to start that up again so he stopped by and we made a juniper berry peppercorn pork loin. Everyone seemed to enjoy it. I made garlic fries and steamed cabbage to go with... and had maybe too much Guinness!

http://www.penzeys.com/
If you are in So Cali you can buy juniper berries from Penzey's Spices in Santa Monica or Torrance, I know they are sometimes very hard to find.
For the juniper rub:
1 1/2 tablespoons kosher salt 
1 1/2 tablespoons juniper berries*
 1/2 teaspoon black peppercorns
2 bay leaves
 2 garlic cloves, finely minced
 2 1/2- to 3-pound boneless pork loin
DIRECTIONS
For the juniper rub:
Place the salt in a small bowl. Using a mortar and pestle or a mallet, crush the juniper berries and peppercorns. Add to the salt. Crumble the bay leaves and add them, along with the garlic, to the bowl. Mix everything well. 
Press the salt mixture evenly over the entire surface of the pork loin. Place in a shallow pan, cover lightly with plastic wrap, and refrigerate at least 6 hours or overnight. Remove from the refrigerator 1 hour before roasting.
Preheat the oven to 375 degrees F.
Place the pork loin in the pot and brown it on all sides, approximately 3 to 4 minutes per side, or until golden brown. Remove the pork loin from the pot.
Bake until the internal temperature reaches 160 degrees F on an instant-read thermometer, about 30 minutes. Remove to a cutting board and allow to rest, covered for 5 to 10 minutes. Slice the roast, arrange on a serving platter and serve. 
 Ours turned out pretty well.
 but a little too salty...
because my lovely cousin who likes very salty food decided to add a little extra salt while he was mixing everything.

Thanks for looking, let me know if you give it a try and how it turns out!

Like it? Pin it!

Sunday, July 15, 2012

DIY Fast and Easy Stamping Summer Nails

I bought a nail art stamp kit a few months ago, I didn't really start playing with it till recently though. My sister enjoyed the stamps so I thought I'd give it a second chance earlier this month. I have really come around to it, it's pretty neat. The best part of it for my is that it is so quick.
When my fiance and I go somewhere my nails seem to to never be done so I do them quickly just before leaving. Since I do them so quickly they are never dry and as soon as I am in the car I noticed at least one nail messed up. With the stamps the polish is pretty much dry by the time it hits my nails & I have a few fast drying top coats so one coat of that and I am good to go.
Here's what you'll need: A top coat (I use Rimmel Base and Top Coat), feature colors for your stamps. nail stamping kit.
First, prep for your manicure, to make it last longer. Remove your old polish, if any, and soak your hands in warm water for a few minutes. Trim your nails and push back your cuticles but don't cut them. Do not use lotions or oils on your hands before you start, it may make the dry time longer.
If you'd like start with a clear or a color base coat. 
I just apply stamp to clean nails.
Apply polish to the disk, swipe with the scraper over the polish 
then pick it up with the stamper. 
Apply to you nail. 
You can apply more designs or more colors of one design like I have in the above pictures. 
When you are happy with the design of your name apply a top coat and you're done!
Thanks for viewing!
 

Saturday, July 14, 2012

Fading Gemstone Bracelet Tutorial


 What you will need: Beads, spacers, french wire, crimp beads, beading wire, clasp and jump rings, tools.
I used 10mm faceted crystal quartz, brass spacers and findings, & solf flex for my beading wire.
 I liked up the order so I can match the fade up on both sides before starting.
Thread your beads with one spacer then one bead. You can mix up and change the order around if ya want. After you are happy with the look of it add one or two crimp beads & french wire to hide your beading wire. Loop the beading wire around your clasp or jump right and side the end into your crimp beads and if you want a bead or two. Crimp & cut your bracelet then you're done!
I had some neat brass rope chain left over from a necklace I made so I used it as an extender and the jump ring for the clasp. I think it was a nice fit for the bracelet.
I also did some in agate!


Thanks for viewing, hope you enjoy!