Showing posts sorted by relevance for query nails. Sort by date Show all posts

Friday, January 6, 2012

How To Have Night Sky Glitter Fade Nails

This look is fast and easy.

Here's what you'll need: A top coat (I use Sally Hansen Dries Instantly, dries in about 30 second), 2-3 glitters colors or glitter polish, and a base coat of your choice (I use Sally Hansen Blue It).
For this I used like color glitters and a transparent glitter that went over both so it didn't cover or change the color of the other two. You can mix it up and use any glitter you'd like over any base you's like. A nice chocolate base with a pink glitter fade looks really nice too! You can also add little silver stars with a tooth pick and polish or a nail art pen if you go with the colors I did to add a nice night sky touch to it.

First, prep for your manicure, to make it last longer. Remove your old polish, if any, and soak your hands in warm water for a few minutes. Trim your nails and push back your cuticles. Don't use lotions on your hands till after you're done, the oils will make the polish take longer to dry.

On clean nails apply base coat, I applied 2 coats. 
Sally Hansen Blue It.
Apply first glitter color to the tips of nails.
Sally Hansen Strobe Light.
Apply this color heavily at the tips.
Lightly apply next glitter color without applying over the first color.

 Sally Hansen Twinkle Twinkle.
Don't apply the second glitter to the end of the nails.
Apply final glitter, it looks best if its a more transparent glitter.

SinFulColors Pearl Harbor
If you have a transparent glitter apply if over the whole nail.
When you are happy with the fade apply your top coat.
All done!
What I used.

Friday, November 16, 2012

Repair your split or cracked nail with a tea bag!

How to repair your split or cracked nail with a tea bag.
 I don't know what I did but today I noticed that I have two chipped nails. Thankfully, a friend taught me a trick a few years back, you can repair the nail with a tea bag!

What you will need is a tea bag, nail glue/super glue/polish, scissors, file, and a chipped nail or two.
This is a pretty quick repair too, took me about 5 minutes with drying time :)
Ew.
Cut a small piece of your tea bag for you nail. I cut and used 3 pieces.
Let your cat smell a piece so she can see that what you are doing isn't that interesting and leave you alone. You can then get back to you nails.
I like to make sure the size is just right. If the piece does not stick you can lick your nail.. 
that's what I do.
After it is where you want it to be add a drop or two of your glue or polish. I would recommend glue over polish. Since the chip on my middle finger was kinda bad I used two pieces. I did one and let it dry then placed the second on and added more glue. I filed the tip once everything was dry.
 I used one piece for my index.
Paint right over your patch work.
 And you are done! 
You can do this every or every other day if needed so you don't have to cut back all over your nails, it will give some time to let the messed up nail grow without ruining the nail of your nails.
Cant even tell :)


Friday, November 9, 2012

Cherry Blossom Nails

I have recently turned my guest bedroom into a home office and while setting up my new office I decided since this is my own space I can go crazy with pink, shared space with the fiance did not let me do that. While I was changing a few things pink I went ahead and did my nails pink too.
Cherry blossoms :)

 Here is how to get this look. 

Here's what you'll need: A top coat (I use Rimmel Top Coat), a base color, feature colors for branch color and flower color, a dotting tool/tooth pick/small brush, and crystals or mini stainless steel balls. You can use your base color and add white to it like I did.
First, prep for your manicure, to make it last longer. Remove your old polish, if any, and soak your hands in warm water for a few minutes. Trim your nails and push back your cuticles but don't cut them. Do not use lotions or oils on your hands before you start, it may make the dry time longer.
  First apply a coat or two of your base color.
 Wait until your nails are dry to add the branches. If you do not have a brown that you are happy with you can mix colors like I did.
 With your dotting tool, toothpick or small brush add a few branches.
 I mixed the base pink and white together for my flower petal color. 
I wanted something just a little lighter for the flowers.
 With your dotting tool or tooth pick again add 3-4 petals(dots) per flower. 
I added 2-4 flowers on each nail.
 I used these mini stainless steel balls for the center of the flowers. 
You can skip this or crystals also.
 I placed a silver one in the center of each flower.
 Add your top coat and you're done.

Thanks for stopping by, I'd love to see if you give it a try!

Check out my current giveaway!

Tuesday, November 13, 2012

Winter Inspired Pink Glitter Matte Nails

I got my Matte Top Coat add on from Julep last week, it came shortly after my November box!
I wanted to do something kinda wintry and this is what I came up with. I like how it came out but while everything was drying it kind of looked like Elmer's glue mixed with glitter so now that's all I can think off!
Pink Glitter Matte Nails
Here's what you'll need: A matte top coat (I used the new Julep matte top coat), a white base color, glitter, and maybe a small brush.
First, prep for your manicure, to make it last longer. Remove your old polish, if any, and soak your hands in warm water for a few minutes. Trim your nails and push back your cuticles but don't cut them. Do not use lotions or oils on your hands before you start, it may make the dry time longer.
Paint your nails with one or two coats of your base color.
While the polish is still a little wet lightly dip your nail in the glitter.
Make sure to cover your whole nail in the glitter.
Tap the tip of your nail on the lid and whip off extra and loose glitter so you don't waste any.
If you missed any spots you can add some of the glitter on with your brush too.
Add a your matte top coat and you are done!
I applied 2 heavy coats to help cover the texture of the glitter.
For a more winter look try blue glitter. 

Check out my current giveaway, ends 11/20!


Monday, July 15, 2013

New Polish- Tip Top Nails!

I received some polish from Tip Top Nails South Africa just before my move to Arizona in April. They had messaged me on my fan page on Facebook a few weeks before my move and asked if I would like to try out their polish... I never turn down trying new polish!
A few weeks after the message I had a small box by my door from South Africa :) As soon as I brought the box in I could smell that something was not right though. Sadly, I was right, one of the bottles did not make it.
 It looked like such a lovely silver too.  I really didn't have time to play with the other colors other than to do a swatch. I just finished unpacking my office last week and my Tip Top nail polish was in the last box! I cleaned off my nails and did my favorite manicure, dots with dots.
You can find my tutorial for  it here.
The blue is Astronaut, red is Pot-O-Berries and the pink (my favorite from the bunch) is Beauty and the Beach which was a duo with micro beads. They all have a very good coverage and the colors are great. The smell is a bit strong for me because I am pets but I really do love the polish other than that.
It is 4 free as the back of the bottle says and has vitamin e which is lovely.
It seems to be long lasting also, I had it on my nails for 5 days before a chip with a Rimmel top coat... that is a very long time for me since I work with my hands.
Over all, I dig it.

You can find more information on their site here- http://www.tiptopnails.co.za
And! you can shop here for the polish here- http://www.zando.co.za
And again their facebook is here- https://www.facebook.com/TipTopNailsSouthAfrica
Stop by their page and tell em I sent ya ;)

Have you tried Tip Top?
If so, how do you like it?  

Follow this blog with bloglovin'
Follow on Bloglovin

 Disclaimer- The polish was given to me to try. I was not paid nor do I get any kind of commission from them for this post.

Wednesday, December 11, 2013

A update from Lanie Buck

I notice that there is still some movement on this blog and I didn't want to leave anyone hanging and wondering where I went if you don't already know I have started a new blog... and fyi it is going great! 
Head to LanieBuck.blogspot.com to see all that you have missed one on!

Here are a few of the current popular posts-
http://laniebuck.blogspot.com/2013/07/inspired-by-nails-with-tutorial-woven.html
 
DIY Easy Stiletto Nails with No Acrylic! 

http://laniebuck.blogspot.com/2013/08/diy-easy-stiletto-nails-with-no-acrylic.html
 
Wantable November 2013 Makeup Box Review 

http://laniebuck.blogspot.com/2013/11/wantable-november-2013-makeup-box-review.html
 The holiday manis, crafts and recipes are just starting too so be sure to follow my new blog on BlogLovin' and like me on facebook!
Follow on Bloglovin


Friday, June 7, 2013

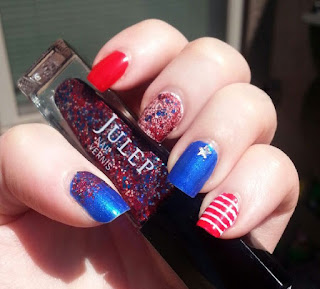
Easy Patriotic Nails!

The 4th of July is just around the corner so I am starting in on the fun with my nails!
The goodies you will need.
Nail art tape.
Polish- Red (Jackie) White (Bunny) Blue (Ally) Glitter (America)
Star glitter (Used stars from America by Julep)
Top coat (Freedom)
Dotting tool
 Apply Jackie (red) to your index finger, Bunny (white) to middle and pinky fingers, Ally (blue) to thumb and ring fingers.
Apply a light coat of America (glitter polish) to your thumb starting at your base and ending in the middle, apply the same glitter over the white on your middle finger.
Apply a single star to the base of your ring finger, I fished out stars from America.
For the pinky nail
 Stripe your nails with your tape, you may need more or less stripes than me depending on the size of your nail.

Apply Jackie (red) to your nail over the tape and let dry for a minute or two. Take the tape off and you have red and white stripes!
Apply your top coat and you are done!
Enjoy!

Check out my other 4th of July inspired nails!
Like it? pin it!
If you’re not a Maven, sign up here, take the style quiz, and use the code FREEBOX to get your intro box for free (plus $3.99 shipping)!  You have until the 19th or so to be able to order the next coming box. There’s nothing to lose! If you don’t like what’s in the box, you also have until the 24th to skip if you don't want the box, and you won’t be charged a thing!
Also, follow me on bloglovin' to know when there are updates.
Follow on Bloglovin