Galaxy Nail Art Inspired Ring Makeover
I was cleaning out my jewelry box the other day and I found these old plastic rings I bought at the mall many years ago, I think I bought the at a Hot Topic when I was a little more on the goth side. I didn't want to throw them out because I still think they looked pretty neat but they were a little boring all black.
I was going to do an ombre fading something on them with bright colors but since there is so much room on them & since I'm kinda a huge nerd obsessed with Star Trek I thought I do a "galaxy" design instead.
If you want to give it a shot with some old jewelry of yours this is what you'll need:
Color polish & glitter polish or paint & glitter- I like polish because it drys fast and drys glossy.
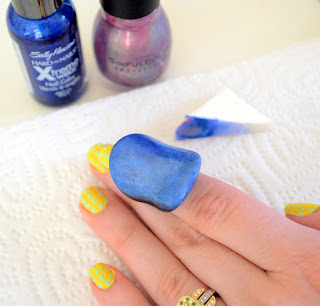
Sponge- I use just a makeup sponge.
Toothpick or nail art tool- For the stars.
Paper towel or a place to make a mess.
To start with if the piece is dark color or depending on the polish you are using you may want to apply a white polish or paint to the base to make your colors pop.
Apply your white and then base color.
Apply your other colors without completely covering your base colors, you want the different colors to show.
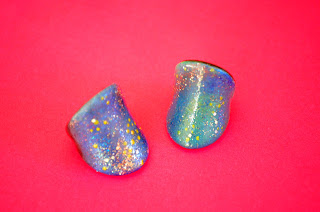
I would recommend using yellows and pinks too. For the first ring I did I stopped with the blue and some purple, I think the second ring I did with more colors came out much better.
Apply your glitter polishes.
I used a fine glitter all over and two other glitters with a mix of sizes for a more dramatic look of stars.
I used a small dotting tool for my stars.
With your dotting tool or toothpick pick up some polish and start making some stars!
Set the ring to dry. You can sponge on some clear polish or a sealer if you want. I like glossy so I dabbed on some clear polish, it also helped make the color pop.
I like how both rings turned out but I really love the colors in the second ring.
Done and done!
If you liked this post check out my tutorial for an ombre inspired picture frame also painted with nail polish!
And if you liked my nails check out my simple polka dot tutorial.
Thanks of stopping by, hope you enjoyed!
Stop by facebook to enter my giveaway to win a cute little ring!
Stop by facebook to enter my giveaway to win a cute little ring!


What a cute project! I love it so much that I decided to feature it in our roundup of galaxy print projects! Check it out here: http://www.favecraftsblog.com/link-love-galaxy-print-diy-craft-projects/
ReplyDeleteHave a great day!
Glad you liked it!
Delete& thank you very much for the feature, love the other picks on your post also!
This is so pretty! Found you through blog lovin. New follower. :)
ReplyDeleteThank you so much!
DeleteAnd yay for Bloglovin, I think you're my first follower from there!
Which is more fun, getting a root canal, paying your taxes, or selling your jewelry? Not much of a choice, but following is some knowledge that can take the frustration out of selling your jewelry. jewelry in phoenix
ReplyDeleteGreat blog you have heere
ReplyDelete