Tuesday, May 29, 2012

DIY Diamond Nail Effect.

Someone told me I should try those Nail Effects press on sticker things. They said it was faster then doing the design and then waiting for it to dry so I thought I'd give it a try. 
I went with the Sally Hansen Misbehaved
via SallyHansen.com

 I really liked the design and the color (my boyfriend did too) but I have very small nail beds so it took me a while to size them to fit or maybe it was because it was the first time I'd use the stickers and don't know all the tricks to size them. Either way I did not have fun applying them & they didn't look that great. I added a top coat and they looked so much better, actually they looked pretty awesome after. 
I like doing my nail while doing my nails so these took away from that & because the sizes are way off for me it did not save on time. Over all I would try these again but only if I saw they were on sale or the design was too awesome to pass up.
 I did really enjoy the design though so I thought I'd do it myself.

Here's what you'll need: A top coat (I use Sally Hansen Dries Instantly, dries in about 30 second), feature colors for your diamonds, a base color, and nail tape. If you don't have nail tape you can just cut thin pieces of any tape but for cleaner lines I would suggest getting some.
First, prep for your manicure, to make it last longer. Remove your old polish, if any, and soak your hands in warm water for a few minutes. Trim your nails and push back your cuticles but don't cut them. Do not use lotions or oils on your hands before you start, it may make the dry time longer.
 Apply your base coat.
 After the base coat is completely dry add a few strips diagonally. Depending on the size of the diamonds you want you may want to add more or less. Space them out as evenly as you can.
 Do the same with the same in the other direction. Press down and smooth out all over the nail.
 Apply the featured color. I went with one coat but you may want to add more depending on what 
color you go with.
 Let the top coat dry completely. Try running cold water over your wet nail to help it dry faster. 
 Start with the last strip of tape and pull straight down from where it starts. Continue until you have taken the first piece off.
Nice clean lines :)
Apply one or two coats of you top coat. I went with two coats to cover the texture of the diamonds.
All done!


Thursday, May 24, 2012

Negative Candle Holder

Make a light box-esque illuminator with this cute summertime DIY project!
via PhotoJoJo

My house is pretty bare as far as decorations go so I was looking up fun, easy & cheap things to do to add just a hair of spice to my patio and living areas. I saw this and fell in love! I don't have pictures of everyone I want in mine so I will be stealing some from their facebook pages (muhahahaha) and turning them into a negative! I'm just going to turn the pictures black and white, crop to the size I want and print them on transparencies.

Other cute film craft ideals!
Click to see the tutorial for these cute place cards.
 via Etsy
 via Flickr.

Thursday, May 17, 2012

New Earrings from Very Enchanting Jewelry.

My boyfriend is let for New York today and will be gone for just over a week. I got a few goodies to make pretties and keep myself busy while he wasn't home but while he was packing I made them a few of them yesterday... I started with the bubble earrings but just went crazy and made to all the earrings I was going to make over the week!

I have a few bracelets and necklace in mind to keep me busy though. I'm also going to rearrange my bedroom and clean up my office... not looking forward to that at all.

These earrings are very very easy to make but can be harder depending on how much handmade you want them. If you want to make your flat back beads like I do with some of mine you'll need to make a mold (I do silicon) or buy a mold you like. You'll need to get resin and follow whatever steps you have for making the beads, this can take up to 48 hrs for the resin to be ready. You can also just buy some flat back beads from a craft stores or sites. You will be your flat back beads, earring post, earrings backs and jeweler's glue.
 Place a little glue on the back of the bead and then place you post on the glue. Hold the post in place for a moment then set it aside to dry for however long the glue says, I always leave them alone for about 24 hours even if the glue says 10 minutes. After they are all dry they are ready to wear so add on the earrings backs and you are good to go!
Bubbles! These guys are what started it. I wanted to see how they would turn out then just kept making them. They turned out way better then what I though. The posts I used make the color pop more, I was scared that the would be very visible and take away from the bubbles. 
These ones are definitely my favorite of these little button earrings. 
Foiled acrylic neon diamond zebra print stud earrings.
I love the green ones so I made a pair for myself :)
Colorful flowers, I make these before and gave them out as gifts during Christmas to a few kids I know and sent an orange pair to my aunt. She loved them!
A bouquet of earrings!
Dino Earrings, these little buddies were once buttons and now are too cute and ready to be worn by and dinosaur lover!
T-Rex yeah! I'm on the look out for some raptors to go with these guys because raptors are the best!

Thanks for stopping by, feel free to shop by my etsy shop to see more of my goodies and more pictures of what I have posted here!


& check out my blog giveaway going on now!

Saturday, May 12, 2012

Win A Pair of Framed Pink Resin Rose Silver Drop Earrings

Very Enchanting Monthly Giveaway. 

I am doing my monthly giveaway on my blog instead of on facebook this time so I can give out more prizes!
The item with the most votes was the Frames Rose Earrings!
So these cute little earrings are up for grab!
You can see more information on this pair of earrings and see more pictures on the Etsy listing.
& I am also giving away two $5 credits to my etsy shop. 


Here is how to enter to win the earrings:
Step One) Follow my blog on bloglovin.
Follow Very Enchanting

Step Two) Comment that you have followed on bloglovin and would like to be entered to win. 
That is all you have to do for your chance to win the earrings. 

How to enter to win one of the $5 credits to my etsy shop. 
Do the first two steps to enter to win the earrings.
Favorite me on etsy & in your comment add a link of the listing you like best from my etsy shop
Become a fan on facebook.

Extra points! 
Join my mailing list!
Sign up for uncovet!


How the winners will be pick. 
All that follow me on bloglovin & comment saying so will be numbered and picked at random for the earrings. Pretty much number out of a hat by my lovely boyfriend.

The same will be done for those that favorite my etsy shop, add a link of one of my listings and become a fan on facebook.  The winner of the earrings may win the $5 credit also :)
Doing the extra points will put your name in twice for the earrings and for the $5 credit. 

The winners will be announced here and on facebook on the 26th.
 Last day to enter is the 25th!

Good luck to all!
Let me know if you have any questions!

~~~~~~~~~~~~Updated 5.26.12~~~~~~~~~~~~

Names have been numbered, place in a hat, pulled out and the winners are...

Tade- winner of the rose earrings. 
Julie Cabral Lear- winner of a $5 credit to VeryEnchanting.etsy.com
Nicole.Girrbach- winner of a $5 credit to VeryEnchanting.etsy.com

I will contact the winners by Sunday the 27th to give or get any information needed so you can get your goodies but if you do not hear from me or an email was not left please email me at akniegirl@gmail.com with "Giveaway" as the subject.


Thank you all for entering. 
Check my facebook page for updates, weekly promotions, chance to vote on the next monthly giveaway and info on my next giveaway that starts June 11th.


Tuesday, May 8, 2012

Simple DIY Drilled Stone Pendants


Follow my blog with Bloglovin
Agate, jasper and quartz, oh my!

I had a few stones just laying around for a while... a long while really & I needed to do something with them. I was going to make some wire wrapped rings but I just don't feel like wire wrapping right now. My boyfriend got a new drill not so long ago so I thought hey, I'll make little pendants out of them. I think they came out pretty well, each stone is pretty enough to be a pendant on its own.
You can find more pictures of all of these on my bonanza page.
Jasper!
More jasper!
And quartz!
A few things you will need for this is!

A drill & small bit, jewelers glue of some kind, stones with no holes (you can cheat and just use beads, I've done that before), eye pins or bails,  water and a place to work!

I didn't think to take pictures as I did it but I will update this soon with my own how to at home friendly version. I did fine this tutorial to share is very helpful.

This is a very simple project. All you have to do it, mark where you want your hole, secure your stone for drilling and place it in water. Drill a small hole about halfway into the stone, add glue to your eye pin or bail and put it in the hole you made, let them sit for however long the glue you are using says (I like to let them site 24-48 hours regardless of what it says) and you are good to go and ready to wear your new pendant! 
Let me know if you give it a try, link your goodies before if you'd like. I' love to see them!

Thanks for stopping by, follow for more updates and weekly/monthly post!


Friday, May 4, 2012

Foiled Glass Bead & Silver Bracelet Tutorial

Foiled Glass Bead & Silver Bracelets
 You will need some kind of beading wire (I used Soft Flex Med 30lb wire), french wire, spacers/charms/beads, glass beads (four or five depending on the size), crimp beads, a clasp and jump rings. 
 Start with a few beads, they don't have to be the same size or shape. I think it adds to it if they are mixed matched and different sizes :)
 After you have a few spacer beads on your wire place you first big bead.
 With the second group of spacers start adding your larger ones, they will be more likely to be seen while being worn so add a few to this group and the next couple. Do this again until you have your 4-5 big beads on the wire and are ready finish.
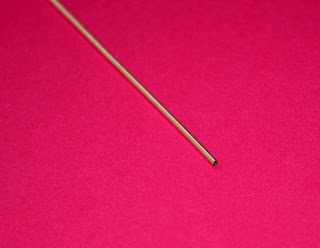
 This little guy is french wire, a thin wire tub. I found out about this guy while working at a jewelry store 9 years ago and feel in love with it, I never make any beading/knotting anything without it. I have noticed lots of beaders use it but a few newbies don't so if you are in the few start using it! It will make the finished product look more professionally done and will keep your findings from rubbing on your wire.
 I always do about a finger width of the french wire. You may like ore or less for your project. This stuff is kinda fragile so cut it with sharp wire cutters, cut fast and hard so you get a clean up and don't unravel what you just cut or the rest of your wire.
 I always finish one end of the project before I cut it from the rest of the soft flex wire bundle. I can leave it and come back later or play with it to see if I need to make any changes before I continue. 
Place one of your crimp beads (seen under my thumb nail) and then your french wire.
 Ad a jump ring or your clasp to one end, flip your wire around and slide it in the crimp bead.
 Pull the wires until your end is tight and everything looks neat. Try to leave some soft flex wire to work with but not too much so it isn't wasted. I always slide of of the soft flex in a bead or two to help it from sticking out or bending funny after you crimp the crimp bead.
 Try now to pull too hard before crimping the bead, you don't want to squish your french wire. Once you are happy with the look of the end grab a flat pair of pliers or your crimp bead pliers if you use those. Wait to cut the extra wire till the end... if you want.
 I measure out about three fingers width of wire on the other end to cut.
 After you cut the wire place your crimp bead and french wire
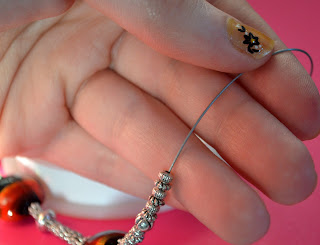
 Pull the wire like before, make the bracelet tight enough so that while you are wearing it you wont see the wire. Be careful to not ruin the french wire while pulling. Place some of the wire under a few beads. Don't put it under too many beads though or the bracelet will be stiff.
 After you crimp the bead and like the look of the bracelet cut the extra wire. Pull the wire as pictured so your get a clean and close cut. You want to make you you can tuck the end of the wire under a few beads so it doesn't show or poke you while you are wearing it.
 Cut!
 Done and done!
 It measures out to 7.5" long. You can make it longer or adjustable by adding a few jump rings or measuring as you go if you have one size in mind.
You can see more pictures of this on my etsy page.
Click on this picture if you like the nails and want to see the how to for them!

Hope you like the bracelet and tutorial, let me know if you give it a try.
Thanks for stopping by!