Saturday, September 15, 2012

Galaxy Nail Art Inspired Jewelry Makeover

Galaxy Nail Art Inspired Ring Makeover
I was cleaning out my jewelry box the other day and I found these old plastic rings I bought at the mall many years ago, I think I bought the at a Hot Topic when I was a little more on the goth side. I didn't want to throw them out because I still think they looked pretty neat but they were a little boring all black.

I was going to do an ombre fading something on them with bright colors but since there is so much room on them & since I'm kinda a huge nerd obsessed with Star Trek I thought I do a "galaxy" design instead.

If you want to give it a shot with some old jewelry of yours this is what you'll need:

Color polish & glitter polish or paint & glitter- I like polish because it drys fast and drys glossy. 

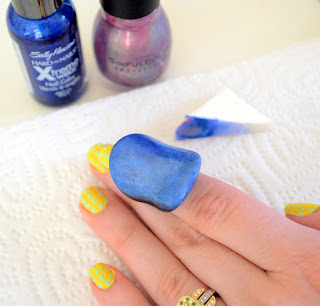
Sponge- I use just a makeup sponge.

Toothpick or nail art tool- For the stars.

Paper towel or a place to make a mess. 

To start with if the piece is dark color or depending on the polish you are using you may want to apply a white polish or paint to the base to make your colors pop.
Apply your white and then base color.
Apply your other colors without completely covering your base colors, you want the different colors to show. 
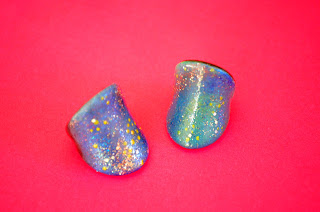
I would recommend using yellows and pinks too. For the first ring I did I stopped with the blue and some purple, I think the second ring I did with more colors came out much better.
Apply your glitter polishes.
 I used a fine glitter all over and two other glitters with a mix of sizes for a more dramatic look of stars.
I used a small dotting tool for my stars.
With your dotting tool or toothpick pick up some polish and start making some stars!
  Set the ring to dry. You can sponge on some clear polish or a sealer if you want. I like glossy so I dabbed on some clear polish, it also helped make the color pop.
I like how both rings turned out but I really love the colors in the second ring.
Done and done! 

If you liked this post check out my tutorial for an ombre inspired picture frame also painted with nail polish!
 And if you liked my nails check out my simple polka dot tutorial.

Thanks of stopping by, hope you enjoyed!

Stop by facebook to enter my giveaway to win a cute little ring!
 

Very Enchanting's September Giveaway!

Become a fan on facebook and follow me on bloglovin to be entered to win one of these pretty rings for September's giveaway!

Giveaway ends on the on the 28th.
Visit facebook for more information on the ring & visit my online shop for for pictures of the rings.

Good luck to all who enter!


Dotting Your Nails With a Nail Art Tool Tutorial.

Dotting your nails tutorial.
Here's what you'll need: A top coat (I use Rimmel Base and Top Coat), base color, color for you dots, & a dotting tool. You can use a toothpick, the very tip of your polish brush if its round or a pen if you don't have a dotting tool. 

First, prep for your manicure, to make it last longer. Remove your old polish, if any, and soak your hands in warm water for a few minutes. Trim your nails and push back your cuticles but don't cut them. Do not use lotions or oils on your hands before you start, it may make the dry time longer.
Start by applying a coat or two of the base color, I used 2 coats of the yellow I use.
Drip some of your dot color on a paper towel or something you don't mind having getting polish on, I used a piece of tape. I am using the largest dotting tool I have, if I was doing darker colors I would have done smaller.
Start at the center and made a few dots, finish off the sides in whatever pattern you'd like. I went with just lines of dots.
Apply a coat or two of your top coat.
And you're done!

Become a fan on facebook and follow me on bloglovin to be entered to win one of these pretty rings for September's giveaway!

Thanks for looking!


Thursday, August 30, 2012

Ombre Inspired Picture Frame Tutorial

Me and my fiance Rob have been together for 3 year next month and in that time we have taken very few pictures together... I could name them all actually since there are about 10. We are both "see threw your own eyes" kinda people it seems so we never think to take our camera or even just pull our phones out. And when we do take pictures Rob usually makes a funny face.

My favorite moment of us trying to take pictures is when we went to La Brea Tar Pits in January and I made a point take the camera to have a picture taken with him. It was my birthday so my little bro Greg came with and while we were walking around I saw a neat tree in a sunny spot and told my brother to take a picture of us. As soon as he said smile I noticed bees in the tree so I looked up! They asked what I was looking at and Greg said he was going to take another. I told them about the bees and told him to do it fast do we can move, as soon as he took the next picture Rob looked up!
I saw bees...
then he saw bees.

My favorite picture(s) of us is from the OC fair  last year when we jumped in a photo booth
Anyway, I had bought two matching frames a few months ago. I had a drawing I did of my Rob in one on my desk already & I wanted to put a picture of us in the other for my desk too but thought the gold was kinda boring so I spiced it up some.
What you will need: 
Paint- 
you will need at least 2 colors & I suggest a white for your base. I used polish because I liked the colors I have more then the paint I have and it dries glossy.
Sponges-
You can use a paper towel or any type of sponge you like. I used a few makeup sponges, You can buy a bag for pretty cheap at  most store. I picked up mine at Rite-Aid for about $2. 
Frames- 
I saw these cute little frames at a crafts store so I got a few.
Maybe Tape-
I did not need to use tape but depending on your project you may have things you need to tape off so paint doesn't get on it.
Start by taking out, off or tape up any thing you don't want paint on.
Apply your white paint to your sponge.
Go around the frame with the white polish/paint. My second color will color the gold with no problems so I just covered enough so my first color will be nice and bright. You can paint white over your whole frame if needed.
Apply as many coats as needed, I have 2 coats. Let it dry or a minute.
Apply your  next color on the sponge.
As you can see in my pictures the gold color started to bleed on my sponge.
Apply over the white.
Let sit for just a min.
On a new sponge apply your second color, you can use the same sponge if you want. I did a few things so I used a few sponges.
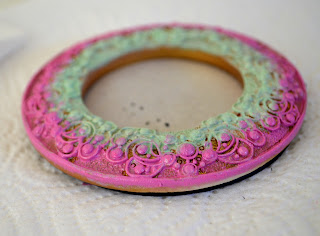
Sponge the polish along the outside meeting the green in the middle.
Almost done, let that dry for a min.
Now to bring the colors together!
Start on the color your are you using on the sponge or dab some of the color off before starting so you don't get too much on the color you are covering. Lightly dab over the second color.
I did 2 frames, I really like how this one turned out :)
Once you are happy with the frames let them dry for a min then add your pictures!
  Add your pictures and you are done!
 And my frames go in front of my pin board, done and done!

 Thanks for having a look, hope you enjoyed and found it useful!

Check out my new shop!

Thursday, August 9, 2012

Patch Up Your Nails Tutorial

Here's what you'll need: A top coat (I use Sally Hansen's Top Coat), base color, "patch" colors (I used 4 colors), nail art pen/polish/ or polish with toothpick/dotting tool for the stitches.

First, prep for your manicure, to make it last longer. Remove your old polish, if any, and soak your hands in warm water for a few minutes. Trim your nails and push back your cuticles but don't cut them. Do not use lotions or oils on your hands before you start, it may make the dry time longer.
Start by applying your base color, I used 2 coats of a french white tip white. 
This look is also pretty cool on a nude nail if you feel like skipping the base coat.
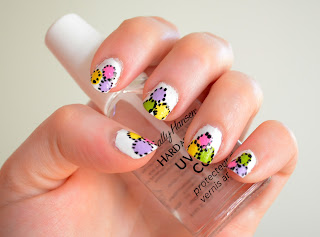
Make 3 dots on your nail leaving some white along the bottom, mix up the colors on each nail.
With your "stitch" polish make a few stitches completely around each dot.
Continue until each patch has been properly stitched in :)
 Apply your top coat and you are done!

Thanks for taking a peek, hope you enjoyed.
If you give it a try feel free to come back and share!

Tuesday, August 7, 2012

Nail Art Tape & Sequins Tutorial

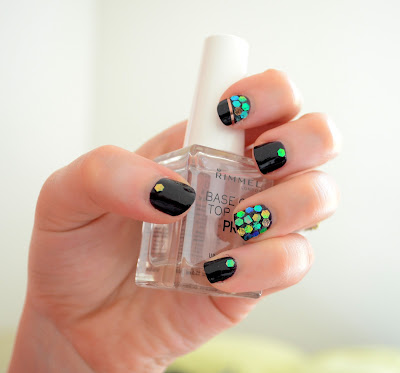
Nail Art Tape & Sequins Tutorial
 I've seen this look a few times and every time I kept thinking I have that glitter, I should do that! I haven't done anything with my nails for about two weeks so I thought now is the time to do the sequin nails, I have put it off enough!
I gave it a try and I am very happy with how it came out, my ring finger is a little messy but I still like it.

Here's what you'll need: A top coat (I use Rimmel Base and Top Coat), base color, sequins glitter, & nail art tape.
First, prep for your manicure, to make it last longer. Remove your old polish, if any, and soak your hands in warm water for a few minutes. Trim your nails and push back your cuticles but don't cut them. Do not use lotions or oils on your hands before you start, it may make the dry time longer.
 Apply one or two coats of your base color. 
*I waited till it was dry to apply the glitter but next time I will try it while still wet.
With a little clear polish on your toothpick pick up a piece of glitter.
 Apply the glitter to your nail.
*As you can see in my picture it is starting to get messy. I put some clear polish on my nail and picked up the glitter with more clear polish. I think if the polish was a little wet still it would have come out better since I would be using less clear. Either start while still wet or apply a coat of clear before I start.
 Continue adding sequins until you are happy with the look. If any sequins is longer then your nail just gingerly trim it with your nail clippers.  
Apply half of your index finger with glitter.
 Cut off some tape from your roll. Apply one end as close as you can to the edge of your nail and trim the other side.
 Add one glitter to the bottom of you nail beds.
Apply your top coat and you are done!

Hope you enjoy, feel free to come back and share if you give it a try!


Like it? Pin it!