Tuesday, November 27, 2012

DIY Gold Foil Chip Nails


I recently picked up some foil to play with and for my etsy shop. I have been obsessed with blue and gold together so I was pretty excited to give it a try.
I went with a rainbow gold foil.
You can find this foil here.
The blue polish is Club Prive by L'Oreal Paris.
It unfolded by itself like magic!
Using a toothpick, dotting tool or your finger make a few pieces that you will be using. If you are using it om the whole nail then cut it into ten pieces to fit your nail. This stuff is fragile so be gentle with it.
Wet the end of your toothpick or dotting tool with water and apply the foil to you almost dry nail. I picked the pieces up with my finger tip but if you want to make sure it goes in the spot you want using a toothpick or dotting tool would be better.
Once the foil is on your nail press it down some, if you want a chipped look rub it around your nail lightly so you don't smudge you polish but you break smaller pieces off and move them around the nail.
The foil also just rubs off the skin so if you get some next to the nail but move it back to the nail so you don't waste any :)
Apply a coat or two of your favorite top coat and you are done! 

Thanks for stopping by!
 feel free to leave a comment, I like them :)

Monday, November 26, 2012

DIY Nail Polish Color

Make a custom color polish in less then 5 minutes ay home!
 I have been working on my own polish line that I will have up for sale on etsy soon. Before I got all the real goodies to make polish from scratch I use to use mica powders, glitter and broken eye shadows to make colors more to my liking or to just make my own color.
 What you will need.
A bottle of polish, mica/glitter/eye shadow, a towel for easy clean up and a funnel.
 I made my own funnel :)
 I used a polish called Invisible (it's not a top coat but you can use that if you want) that was less the $3.
 Place you brush/top to the side and place the funnel in bottle. Cut back the bottom of the funnel or hold it so it doesn't touch the polish, when you pour in your color it will get stuck in the funnel.
 Boom, color!
If you are using eye shadow or make up that isn't powder make sure to crush it into a powder before adding it. You will have lumps in your polish if you don't.
 You can add glitter or other colors if you'd like, play with it until you are happy.
 Shake that baby up!
 Apply your polish and you are done!
Enjoy your new custom polish!
Thanks for stopping by, feel free to leave me a comment :) 

Check out my new nail art goodies and polish on etsy!
 

Sunday, November 25, 2012

Cyber Monday Giveaway!

 Cyber Monday Giveaway! 
Enter now to win these lovely new earrings! 


Check out a few of the Cyber Monday deals! 
 40-55% off all goodies and free shipping in US!
  Can't get better then free!
Happy shopping!

Thursday, November 22, 2012

Holiday sale!

The food has come and gone and now its time to start the holiday shopping! 

Get 40% off all order with free shipping in the US from now till Cyber Monday for the Black Friday sale! Get 55% off when you spend $55 or more! Happy shopping everyone!
http://bonanza.com/veryenchanting
  And on etsy get 20% off!

Monday, November 19, 2012

Orange smoothie just like the dream machine!

I have loved the Orange Dream Machine smoothie from Jamba Juice since the first day I had many years ago. I recently have been getting it a couple times a week but sadly had a cold last week and didn't feel up to going out of the house just for a drink so I looked for a recipe that would match and played till I was happy with it. It still is a little different from it is so good & will save me some money doing it at home so I can have more!

For a large smoothie-
7oz of Orange Juice
4oz of Soy milk
2 scoops of orange sherbet
2 scoops of vanilla frozen yogurt
and a scoop of crushed Ice

Direc­tions:
Add the liq­uids on the bot­tom first, then the solids and finally the ice.
Using a house­hold blender, blend until it’s a creamy smoothie.
Poor in a fun glass with a straw and a piece of fruit for a garnish.

Done and done, enjoy!


Sunday, November 18, 2012

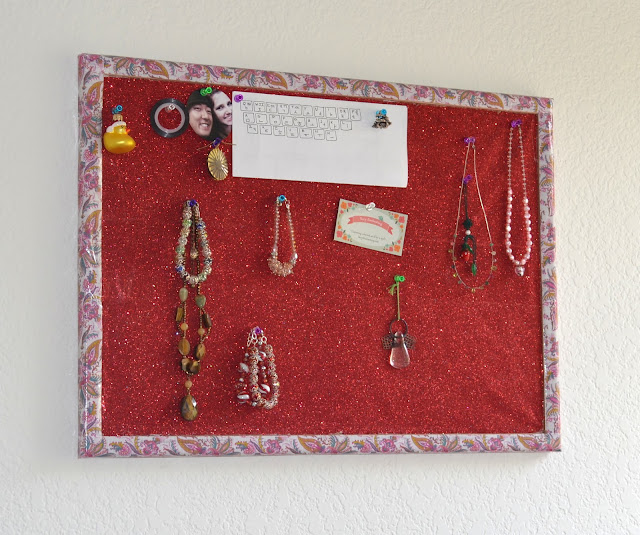
Spice up your pinboard.

I recently changed our guest bedroom into my home studio! It was the office for my roommate, fiance and myself before a guest bedroom but it was very hot with all of us who work all work from home with 3-6 computers all going at once... network guys.We had people over but they crashed on our couch so it became just an unused room. Since it was not being used I decided to take all my work stuff and put it in one space, it was half in my bedroom and half in the living room.

Since I no longer have to share space with guys I can make things more girly :)
I found a roll of glitter paper and covered the cork board a few months ago using just the paper and a glue gun. I think now that I have the pink tape on it I will change it to a teal or baby blue.
You will need a roll of fancy duct tape, I found this tape online but I have seen it everywhere.
You will also need scissors and a glue gun.
I had never used the fancy tape before so the night before I taped up the board and it looked great but in the morning all the tape started to come off.
So I strongly recommend using a glue gun to help keep the tape down, glue the front and the back.
Once you are happy with your board and everything is down and staying down hang it up!


Friday, November 16, 2012

Repair your split or cracked nail with a tea bag!

How to repair your split or cracked nail with a tea bag.
 I don't know what I did but today I noticed that I have two chipped nails. Thankfully, a friend taught me a trick a few years back, you can repair the nail with a tea bag!

What you will need is a tea bag, nail glue/super glue/polish, scissors, file, and a chipped nail or two.
This is a pretty quick repair too, took me about 5 minutes with drying time :)
Ew.
Cut a small piece of your tea bag for you nail. I cut and used 3 pieces.
Let your cat smell a piece so she can see that what you are doing isn't that interesting and leave you alone. You can then get back to you nails.
I like to make sure the size is just right. If the piece does not stick you can lick your nail.. 
that's what I do.
After it is where you want it to be add a drop or two of your glue or polish. I would recommend glue over polish. Since the chip on my middle finger was kinda bad I used two pieces. I did one and let it dry then placed the second on and added more glue. I filed the tip once everything was dry.
 I used one piece for my index.
Paint right over your patch work.
 And you are done! 
You can do this every or every other day if needed so you don't have to cut back all over your nails, it will give some time to let the messed up nail grow without ruining the nail of your nails.
Cant even tell :)