Friday, May 4, 2012

Foiled Glass Bead & Silver Bracelet Tutorial

Foiled Glass Bead & Silver Bracelets
 You will need some kind of beading wire (I used Soft Flex Med 30lb wire), french wire, spacers/charms/beads, glass beads (four or five depending on the size), crimp beads, a clasp and jump rings. 
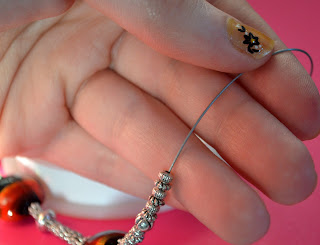
 Start with a few beads, they don't have to be the same size or shape. I think it adds to it if they are mixed matched and different sizes :)
 After you have a few spacer beads on your wire place you first big bead.
 With the second group of spacers start adding your larger ones, they will be more likely to be seen while being worn so add a few to this group and the next couple. Do this again until you have your 4-5 big beads on the wire and are ready finish.
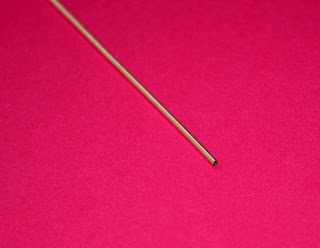
 This little guy is french wire, a thin wire tub. I found out about this guy while working at a jewelry store 9 years ago and feel in love with it, I never make any beading/knotting anything without it. I have noticed lots of beaders use it but a few newbies don't so if you are in the few start using it! It will make the finished product look more professionally done and will keep your findings from rubbing on your wire.
 I always do about a finger width of the french wire. You may like ore or less for your project. This stuff is kinda fragile so cut it with sharp wire cutters, cut fast and hard so you get a clean up and don't unravel what you just cut or the rest of your wire.
 I always finish one end of the project before I cut it from the rest of the soft flex wire bundle. I can leave it and come back later or play with it to see if I need to make any changes before I continue. 
Place one of your crimp beads (seen under my thumb nail) and then your french wire.
 Ad a jump ring or your clasp to one end, flip your wire around and slide it in the crimp bead.
 Pull the wires until your end is tight and everything looks neat. Try to leave some soft flex wire to work with but not too much so it isn't wasted. I always slide of of the soft flex in a bead or two to help it from sticking out or bending funny after you crimp the crimp bead.
 Try now to pull too hard before crimping the bead, you don't want to squish your french wire. Once you are happy with the look of the end grab a flat pair of pliers or your crimp bead pliers if you use those. Wait to cut the extra wire till the end... if you want.
 I measure out about three fingers width of wire on the other end to cut.
 After you cut the wire place your crimp bead and french wire
 Pull the wire like before, make the bracelet tight enough so that while you are wearing it you wont see the wire. Be careful to not ruin the french wire while pulling. Place some of the wire under a few beads. Don't put it under too many beads though or the bracelet will be stiff.
 After you crimp the bead and like the look of the bracelet cut the extra wire. Pull the wire as pictured so your get a clean and close cut. You want to make you you can tuck the end of the wire under a few beads so it doesn't show or poke you while you are wearing it.
 Cut!
 Done and done!
 It measures out to 7.5" long. You can make it longer or adjustable by adding a few jump rings or measuring as you go if you have one size in mind.
You can see more pictures of this on my etsy page.
Click on this picture if you like the nails and want to see the how to for them!

Hope you like the bracelet and tutorial, let me know if you give it a try.
Thanks for stopping by!


Golden Nails with Black Flower Stickers Tutorial


I haven't done anything to my nails for a few weeks since my hands keep getting hurt. My ring finger on my left hand had the nail split and broke right in the middle of the nail while playing  football on Easter with my brother, cousin, cousin's lady & boyfriend. Good news though is that I caught the ball from like 20 feet away! It just grew back enough so I can paint it again. I also have some scratches & burns on my right hand right now, blah. I've missed having pretty nails :)
Here's what you'll need: A top coat (I use Sally Hansen Dries Instantly, dries in about 30 second), a base color, and nail stickers. Remove your old polish, if any, and soak your hands in warm water for a few minutes. Trim your nails and push back your cuticles but don't cut them. Do not use lotions or oils on your hands before you start, it may make the dry time longer.

 First, paint your nails with your base color. I went with gold since my stickers have a small gold charm on each flower. You can apply a couple coats if you want, I applied one coat because I wanted a softer look this time. Wait until your nails are completely dry before placing any stickers. You will be holding them down some and could mess up the paint job if they are not dry.
 Grab the sticker you want on the nail. Try to grab it only by the tip on the sticker as seen in the picture below this one.
 Think about where you want it on the nail before you place it on the nail, these stickers are sometimes very sticky and may mess up your paint job if you have to move it.
 Place the sticker down with your finger. You want the sticker to be laying as flat as possible so it can be sealed in with the top coat and not get caught on anything or torn off if snagged. 
 Finish applying the sticker where you want them.
 Then apply a coat or two of your top coat. If your stickers are thin one coat should be fine but if they are thicker you may want to apply more coats so the sticker don't get snagged on anything.
 Done and done!
Click here to see how to make this bracelet!

Thanks for stopping by, hope you find this post helpful!

Wednesday, April 18, 2012

Simple Framed Resin Rose Drop Earrings Tutorial

Framed Resin Rose Drop Earrings Tutorial


You will need hooks, flat back beads or stones, frame charms
roughly the size of beads & glue. I used G-S Hypo cement, it is a very
good glue, it's also pretty cheap & dries in ten minutes. I don't think you
can buy it from craft shops but you can find it online for $2-4 a tube
or at most jeweler's marts.
 Place a drop of glue in the center of the charm and place you bead
on top. Press down on the top of the bead and hold it for a few
seconds. Let it dry flat on its back as pictured above for about
ten minutes. Try not to use too much glue so nothing spills over the
sizes of the charms.
 Place the charms after they dry on the hooks and you are good to go!
 If you have double sided charms like mine you can add a picture
or leave it empty like I did. If these were bigger I would had
something to the back.
 You can see more pictures of these earrings on my etsy shop.
You can also buy supplies to make these on my etsy supply shop.

Thank you for looking, hope you enjoyed the post!

Monday, April 16, 2012

Treats for Mother's Day

I don't think I will be able to see my mom next month for Mother's Day but I am planning on sending her some goodies in the mail.  Here are a few easy treats you can try for your mother.

A vintage style necklace is always a nice gift.
You will need some chain, charms, clasp & jump ring.
The chain I use is open links.
You will need 2 pairs of pliers and if your chain 
is not an opened link you will need wire cutters.
Start with opening one link and slip one charm on then close.
Do the same to the other end of the charm with the end of the chain.
Measure out how far apart you want the charms to
 be from each other and open one link like before.
The necklace will look like this after both charms are added.
 Open a link in the center of the back of the
 necklace and slid your jump ring on one end.
 On the other place your clasp.
Done and done :)
I added a third charm to the front & a heart shaped pearl.


Candles!

Bath Salt Bars!

Book Cover Case

Roll Up Knitting Case

Thanks for viewing and happy crafting!

Wednesday, April 4, 2012

Easter Garlands!

My house is very bare with only 4 days till Easter so after looking up some inspiration I decided to go with garlands! After I put the baskets out, my kid sister makes her eggs, I make all the cookies and Easter cupcakes the house will look better but I still need some things up now.

Easter Paper Egg Garland 
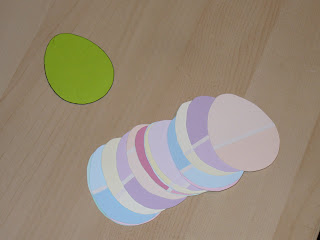
Make an egg template (I added a template below that you can use) and cut out a bunch of eggs (using paint chips/colour paper) and punched two holes in the top of each egg. I also like to use some bright wrapping paper.


Easter Egg Garland
I think these are so cute! I couldn't find a tutorial for these but they seem pretty easy to make. 
I will be using plastic eggs so I can store them without having to be too gentle with them. 

Make a hole in the top and bottom the the eggs using a hot needle or nail. Make sure the hole is big enough for the string or ribbon you are using. Decorate the eggs with glitter, paint or how ever you'd like. Let then dry then string the up and hang!

Carrot Garland
Using a paper trimmer, cut a 1.5 inch strip of orange card stock and punch down both sides with scalloped border punch. Trim three strips of .75 inch green card stock in lengths varying from 5 to 5.5 inches long. Fold all strips in half. Sandwich and staple as shown below. Pull the ends of the orange strips around and staple to secure in a carrot shape. String carrots together using a 1/16 inch hole punch.

Here are some Easter templates you can use to make some Easter garlands from NaNa Company!
Head to Amy's blog to download and print!
http://nanacompany.typepad.com/nanacompany/2012/03/-easter-templates-by-nanacompany.html

Happy Easter!

Check out my other Easter post!
Pineapple Apricot Glazed Ham For Easter
Easter Eggs


Sunday, April 1, 2012

Holiday Pineapple Apricot Glazed Ham

My family has never been very big on ham so my mom only made it once a year. I always loved Easter because I love ham and that was when she made it. My mother taught me how to make this glaze when I was about 12 and her father taught her. When I was 16 I took over the holiday cooking and have been making the ham this way ever since. Sadly, this year I will be the changing the recipe. I am allergic to pineapple and if I only had a little before it wasn't too bad but now even a little kills me. So this year I will be doing an apricot only glaze, goodbye sweet pineapple. I hope it comes out alright.

Enjoy!


Pineapples and apricot add a sweetness that complements the salty flavor of the ham.

SERVES: 8-10

INGREDIENTS:
5-7 pound ham
1/2 cup cloves
2/3 cup brown sugar
1 can (16 oz.) apricot pineapple preserves
1/3 cup yellow mustard
1 can (20 oz.) sliced pineapple (rings)

INSTRUCTIONS:

Rinse the ham with cold water then pat dry with a paper towel. Using a sharp knife make surface cuts in the shape of a 2-inch X all over the ham. Place 1 clove in the intersection of each X.

Place individual rings of pineapple on the ham, using more cloves to secure the pineapple.

Place the ham in a large roaster pan. Cover the pan, place in the oven, and bake for 1 1/2 hours at 350F degrees.

In a mixing bowl, add the sugar, mustard and preserves. Stir until the glaze is mixed well. You can start with 1/2 a cup of sugar or add more mustard if you'd like. Play with it till you like it best. 

Uncover the ham and pour the mix on top. Cook for 30 minutes more, occasionally basting with the mix to form a sweet glaze.

Prepare the ham for serving by removing the pineapples and the cloves. Discard the cloves. Serve each slice of ham with 1 pineapple ring and some glaze.

Enjoy the glaze, the ham and the pineapple!
Happy holidays!
Check out my other Easter post!