Thursday, May 16, 2013

Sneak Peek of Julep June 2013 Box

Yesterday, Julep changed the header image of their YouTube Channel to this image... 4CcdOcl

So these may also be the polish for June. They look like a few polishes that are already out but they may not be. I am hoping for a make your own box, I think that may just be wishful thinking though.
 Julep also released this video on their youtube channel on the 14th and sent out an email about the DD Creme so that will be in the June box!

I noticed that they increased the price of the add-ons but I am excited to see if they added the goodies they did for Sephora.

I can’t wait until the 20th of each month to find out what’s in the next month’s box.
If you’re not a Maven, sign up here, take the style quiz, and use the code FREEBOX to get your intro box for free (plus $3.99 shipping)!  You have until the 19th or so to be able to order the next coming box.
There’s nothing to lose!  If you don’t like what’s in the box,you also have until the 24th to skip if you don't want the box, and you won’t be charged a thing!

Are you excited June’s box?

Tuesday, May 14, 2013

20's trends with Julep!


My vintage inspired look with Claudette and Kathleen on my nails, Jet Black mascara for the lashes, and Lady in Red on my lips!
I also used  Pro Lesson Palette: Green Eyes & Yaby Concealer.

Send my look some love on my Ipsy profile!

My May Julep goodies!
This month with Julep I went with their new Modern Beauty Maven profile.
I received the Sugar Smooch Lip Scrub: This scrumptious blend of brown sugar, molasses, conditioning oils, vitamin E, and shea butter will leave your lips soft, smooth, and ready for color (or kisses) 
New York Jazz Lipstick Trio: Silky little lip colors inspired by the Roaring Twenties. Set Includes: Tea for Two - Nude shimmer lip sheer, Satin Doll - Poppy lip sheer, Lady in Red - Matte crimson lip color
American Beauty Volumizing Mascara: Jet black. Lash growth enhancement ingredients and micro-fiber applicator separates, conditions, and plumps individual lashes for a thick and gorgeous finish.

No new polish this month but the lipstick more than makes up for it! 
I used a my favorite red by Julep Claudette for my 20's inspired nails. A trend in the 20's was to just paint the middle of the nail a bright red. Gold was also a big hit color for 20's so I added Kathleen.
Here is a fast and easy tutorial.
 The colors used.
 Apply a coat or two of Kathleen
 Using scrapbook fancy scissors cut 10 pieces of tape for each hand.  
 Apply a coat or two of Claudette and wait until it is completely dry.
 Remove the tape, apply you top coat and you are done! 

You can find the goodies used by Julep on their site.
If you're a Maven what did you get?

Monday, May 13, 2013

Bright crystal toes!

I have been rocking boring toes lately so I decided to spice them up since I just got a few awesome new bright colors from Julep.

For this pretty easy look you will need:
A few toes.
2 different polish colors... or more. 
A base and top coat- I used a matte top coat. 
If you are using bright colors like me I would use a base coat to help with staining. I have not had staining with the colors I am using for this look.
Apply Abbie by Julep on all but your big toes.
I used 2 coats.
Next apply the lovely Avery on your big toes.
I again used 2 coats.
I used pink and yellow crystals for this look.
You can also use some kind of glitter if needed.
Apply one the crystal or glitter that matched the big toes to the center of the other toes.
On the big toes apply both colors alternating along the base of your toe. I used 3 pink and 3 yellow for each big toe, you may need more or less depending on the size of your crystals and or toes.
Apply your matte top and you are done!
You can apply a glossy top but since I no longer live by a beach after moving to AZ from CA I wanted that "walking in the sand" look you get from well, walking in the sand :)
Enjoy your toes!

You can find the polish, base and top coat by Julep on their site.
Let me know what style you are!
I'm a classic with a twist :) 
Check out my last spring tutorial with Julep! 

Thursday, May 9, 2013

Fit. Clear. Tan. Ellie Giveaway!

Enter now for your chance to win these goodies! 
I just found Cut and Blow, the destination that delivers everything Hair and Beauty - at private sale prices. Members discover new offerings daily - each available only for a short time. 


Tuesday, May 7, 2013

Apple Upside-Down Cake Recipe

Apple Upside-Down Cake Recipe
What you will need. 
1/4 cup butter
1/2 cup packed golden brown sugar
2 medium apples, peeled and cored
1 9oz pack of yellow cake mix
1 tsp. ground cinnamon
1 tsp. rum extract

Spray a 10 inch round pan with nonstick baking spray. 
Line the bottom with parchment paper. 
In a medium skillet  melt butter over medium heat. 
Add sugar and cook for 1 minute or until bubbling. 
Spread evenly on the bottom of the pan. 
Set aside to let cool. 

Slice applies into thin wedges. 
Place wedges slightly overlapping each other in a circular pattern on the sugar in the pan.

Prepare cake mix according to package directions.
 
Add in cinnamon and extract.
 Mix it all up!
Pour batter into pan over apple slices. 

Bake at 350 for 40 to 45 minutes or until a toothpick come out clean. 
Remove cake from oven, let cool for 3 minutes. 
Carefully invert onto a serving platter.
Let cool for 15 minutes before slicing.
  Enjoy!


Follow this blog with bloglovin'
Follow on Bloglovin

Full Sneak Peek Of Ipsy's May 2013 Glam Bag!

I am so excited for this month's Glam Bag from Ipsy! 
I believe the perfume is going to be a random mix but I hope I get the rumored Pacifica one. 
I have been obsessed with the brand since I got it in my first Ipsy bag. 
You can see that bag here.

If you are getting the May bag what are you most excited about?

And if you are not already side up join me on ipsy and subscribe to the Glam Bag! You get 4-5 beauty products every month delivered to your door, for just $10. Michelle Phan curates the bags! 
Also, check out my Stylist Profile here!


Follow this blog with bloglovin'
Follow on Bloglovin

Thursday, April 25, 2013

DIY Beauty: Make Your Own Perfume

 
Materials
    2 oz. glass spray bottle
    grain alcohol
    essential oils of your choice-  you can often find pre-made blends that smell delicious if not using or making your own.
      Directions
      Put 30-40 drops of the essential oil – depending on how strong it smells – into your spray bottle. Top off with the alcohol, close the bottle, and give it a good shake to blend everything together. You can use your homemade perfume just like any other perfume or cologne.

      Follow me on bloglovin'!
      Follow on Bloglovin

      Monday, April 22, 2013

      The brights by Julep for Spring!

      The 2013 April polish from Julep was all about color! 


      They also had a cuticle pen and dry shampoo that I love! My cuticles look much better after two weeks of use and the pen still has a good bit in it. The dry shampoo is pretty nice too though I have never used another so I have nothing to compare it to. It adds a good amount of volume for the second day which I really like. I always wash my hair every or every other day so this is great for the next day if I have curls and don't feel like having to do my hair over. I think it is safe to say I will be buying more of each later.

      I was in the middle of packing for my recent move when it came so I didn't have much time to play with it but I was able to squeeze in 2 manicures before packing my box away :)
      I was dying to use their rock candy jelly polish since it was added to Sephora... but I wanted to get it from Julep. I get member points when I buy from Sephora but I get member points and a discount when I buy from Julep so I just wanted till it was added to a box. 
      I wanted to use all of the colors in the box as soon as I opened it, I upgraded so I have all these great colors! I love yellow polish with my skin tone so when I saw Abbie I was instantly in love. I thought a french tip with Abbie and Candy would look nice and I was right.
      I added some light purple crystals to add a little pop to them.
      For this look you will need nail art tape, Julep Candy, Abbie, Freedom top coat & crystals.
      First, prep for your manicure, to make it last longer. Remove your old polish, if any, and soak your hands in warm water for a few minutes. Trim your nails and push back your cuticles. Do not use lotions or oils on your hands, it may make the dry time longer.

      Apply 2-3 coats of Candy or another jelly color. I have 2 coats of Candy.
      Make and x with your tape near the tip of you nails so you have the small triangle on the whites of you nails. Apply a coat or two of Abbie or another color if you wish.

      After it is completely dry removed the tape. Finish the rest of you nails and add the crystals to the center of you x. You can see how I apply my crystals if needed on this nail tutorial.

      Apply a thick coat of your freedom top coat and you are done!

      Enjoy your lovely bright nails!

      I don't know why my thumb nail corners looks so round... Anyway, here is a close up!

      I also got to play with Avery from my Classic with a twist Maven profile. Since is a bright color I used my base coat to help staining of my nails if there was any... when I took off the pink there was no staining thankfully.
      I wanted very spring time nails with this pink so I went with light flower to make the pink of Avery pop! 
      This is such a lovely pink that my fiance who is known for hating pink loved it, he kept complimenting on how nice the color looked on me.
      I think it is safe to say I love the brights from Julep this month and can't wait to play with the rest of colors.
      You can find the polish, base and top coat by Julep on their site.
      Let me know what style you are!
      I'm a classic with a twist :) 
      Check out my last spring tutorial with Julep!

      Tuesday, April 16, 2013

      Goodbye California!

      On April the 19th I am starting a new chapter in my life.
       I will be leaving sunny California for even sunnier Arizona!

      After my fiance and I talked about leaving California for almost a year. We spent a weekend in AZ and like everyone told me I fell in love with it. We found a great 4 bedroom house with a yard for our pup for less then our current rent! I have only lived in California so I am a little scared of being in a new place but I am very excited and think Friday can't come fast enough... or maybe I should say Saturday since the 6 hour car ride Friday is going to kinda suck with a old man pug and two spoiled cats!

      Also, next year on the 19th is my wedding day!
      Yay for new things, places and people!

      Saturday, April 6, 2013

      Spring Dried Flower Burst Nail Tutorial

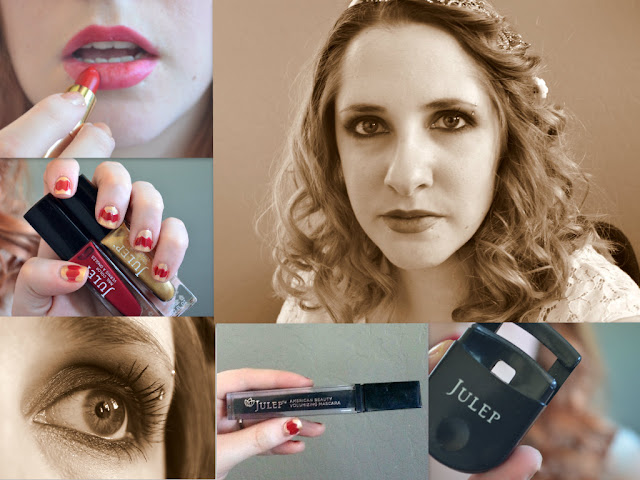
      Spring flower nail tutorial with real flowers! 
       I saw these flowers a few times before buying them. Finally, I decided I had to give them a try and I am so happy I did! I loved how they turned out and were easier to use then I thought. I am
      You will need a base coat, feature polish, top coat, dried flowers, nail scissors, dotting tool & tweezers.
      A base coat is not needed, I use it because it limits the the stain on my nails when using bright colors and the flowers have a good bit of dye in the. You also don't need tweezers but it does make things slightly easier.

      First, prep for your manicure, to make it last longer. Remove your old polish, if any, and soak your hands in warm water for a few minutes. Trim your nails and push back your cuticles but don't cut them. Do not use lotions or oils on your hands before you start, it may make the dry time longer.
      The goods by Julep I used.
      I used just one bundle for both hands.
      Start by applying a coat of your base color, give it a minute or two to dry.
      Apply a coat or two of the feature color.
      I let it dry for about 2 minutes, I also ran cold water over my nails to help it dry faster.
      I used my Rimmel top coat as a glue for the flowers.
      Apply a thin coat of the top coat you are using as glue and place the flowers on your nails the way you want the to lay. Until you are happy try not to press down to hard. The tweezers will come in handy with this part.
      Using your scissors cut the flowers near the base of the bundle. 
      There is one stem that lost a flower when I cut the rest on my nail from the bundle. 
      You can use your dotting tool to pick up any flowers that fall to apply on empty stems.
       Dip your dotting tool in a little polish and pick up a flower.
      Apply a little more clear top coat for glue if needed by the empty stem and apply the pick up flower.
      Apply as many or as few as you want to you nails, I did little burst of flowers on my nails.
      Give your nails a minute to dry then apply your polish.
      Using Julep's Freedom top coat dab over the flower so you don't have air bubbles and to cover the whole flower and so you don't move the flowers. Apply a thin or thick if needed coat to smooth things out.
      Let dry for five minutes and you are done!
      Enjoy your pretty spring nails!

      You can find the polish, base and top coat by Julep on their site.
      Let me know what style you are!
      I'm a classic with a twist :)

      Follow me on bloglovin'!
      Follow on Bloglovin