Thursday, October 18, 2012

A very yummy beef roast recipe.

 The one day of cold weather we had Southern California last week has made my stew and roast hunger start. I make light chicken soups in the summer and heavy beefy stews in the colder months. Anyway, although California has changed it's mind and went back to summer weather I have started the first of many roast for this year. 

This is the man that has started it all. 
My grandpa, he made it this way and showed my ma and she showed me. Pretty much any roast or stew Mr. John Flood made was not right unless it has brown gravy, potatoes, and onions. That man was crazy about onions too, my ma use to tell me that after the war he would eat onions like apples almost everyday. I do that with garlic but an onion is a little too much for me!

So, here is how you make this lovely homemade roast and or stew.
This services 4-6 people depending on the serving size. 
You will need for the roast
1 teaspoon olive oil
1 (2-3-pound) boneless chuck roast
1 teaspoon salt
1 teaspoon black pepper
2 chopped onions
3 garlic cloves, chopped
1 (14-ounce) can beef or veggie broth- we have always used Swanson
2 oz tomato sauce
2 tbsp brown gravy
1 bay leaf
4 large carrots, peeled and cut diagonally into 1-inch pieces
3 medium or 4 large potatoes
1-2 cups of fresh petite green beans
Add any other veggies you want, I like to add cabbage... to everything.
If stew double the broth, pepper, tomato sauce, gravy, bay leaf, and add about a tsp of cumin, some water, and whatever veggies you want. I always add cabbage and cauliflower and sometime I add a tsp or two of cayenne pepper.

The beef!
I marinade it over night in some veggie broth, pinch of salt and pepper & some garlic power.

Preheat oven to 325º.
Heat olive oil in a large pan over medium-high heat. Sprinkle chuck roast with salt and pepper. Add roast to pan; cook 5 minutes, turning to brown on all sides. Remove roast from pan. Add onion to pan; sauté 8 minutes or until tender.
Place browned roast in your baking dish. Add all of your goodies to your dish and bake at 325° for 2.5 hours or until the roast is almost tender.
Remove bay leaf from dish.
 Yummy!
Shred meat with 2 forks. Serve roast with vegetable mixture and cooking liquid. 
If it is stew just put everything in a pot and cook for a few hours. I cook it until the cauliflower has become one with the broth because my fiance hates cauliflower.
Enjoy!


Check out my giveaway!

Sunday, October 14, 2012

Very Enchanting's October Giveaway- Updated!

~~~~~~~~~~~~~~~~~~~~~~UPDATE~~~~~~~~~~~~~~~~~~~~~~
Octobers Giveaway has started!
Enter to win on facebook!
Like and share for more chances to win!
Leave a comment here with the color you'd like to have if you win!
Only way to pick the color is to leave a comment below between 10/14-10/29!

Good luck all, thanks for voting, entering and liking my facebook page!
Visit my facebook page at http://facebook.com/veryenchanting for more information the this months giveaway!

~~~~~~~~~~~~~~~~~~~~~~UPDATE~~~~~~~~~~~~~~~~~~~~~~


Follow me on Bloglovin!
Follow on Bloglovin

October's giveaway will be starting soon and before it does I am giving you a chance to pick and vote on the prize!

Take the poll below to pick your favorite!
The giveaway will start on facebook on the 19th.
Pick your favorite here and leave a comment if there is a color prefer.
The only way to pick the color of the prize if you win is to comment here.
Winner(s) will be sent a random color if no comment is left before or during giveaway.
Earrings with the most votes will be the in October's giveaway! 
Pick your favorite!
  

October's giveaway will be on facebook but just so I know if you'd prefer it not be now is your chance to let me know.
I like giveaways on...
  

Thursday, September 27, 2012

Halloween Inspired Spider Web Tip Nails

 I love this time of year & the holidays that come with! I have been dying to break out my Halloween goodies and start decorating my house. My fiance and I moved into a house last year with very tall ceilings and we were not prepared to decorate that high. Everything turned out cute but it wasn't awesome. This year I am going for awesome. Anyway, so I don't seem crazy I am waiting till next week to start setting stuff up but I still wanted to do something right now so I did my nails! 

Here's what you'll need: A top coat (I use Rimmel Top Coat), a base color (I went with black to make the white pop), a feature color for your web, tape, & a toothpick/small paint brush if your web color polish isn't nail art polish.
First, prep for your manicure, to make it last longer. Remove your old polish, if any, and soak your hands in warm water for a few minutes. Trim your nails and push back your cuticles but don't cut them. Do not use lotions or oils on your hands before you start, it may make the dry time longer.

 Using good ol' scotch tape cover the part of your nail where you don't want your base color to be.
 Apply one or two coats of your base.
 Remove your tape when it is completely dry.
 You will be making three lines like this.
 I used a small paint brush and dabbed white polish on some tape. Make a thin line along the bottom your your base color where the tape was, make one in the middle and along the side or top of your nail depending on where you started. You can make more lines if doing your whole nail but make sure you have an odd number of lines.
 Lines along the top and side.
 You can touch up your lines with your base color if you lines are as neat and you'd like.
 Inside the lines make bowed lines or "c" shaped lines.
 Apply a coat or two of your favorite top coat and you're done!
Webs!
 I am pretty happy with how it turned out. 
I think closer to Halloween I'll give it a try with purple.

Thanks for stopping by!

Check out my current giveaway ending tomorrow the 28th!
 Check out my current sale on my new site, only $9.09 for these earrings right now!
And set a text alert for this lovely silver bee ring valued at $195 starting at only $70 on tophatter!
Auction starts on Oct 2nd.


Wednesday, September 26, 2012

Minty Glittery Gradient Nails


I am a huge fan of pink and greens together and have been neglecting one of my favorite polish colors, Sally Hansen Mint Sorbet color. It chips within a week but I change my polish 1-3 times a week anyway so I don't mind, plus it's only $2 a bottle.

Here's what you'll need: A top coat (I use Rimmel Base and Top Coat), a minty color, glitter polish, & a sponge. You can use a white polish as your base to help make you minty color pop if needed.
First, prep for your manicure, to make it last longer. Remove your old polish, if any, and soak your hands in warm water for a few minutes. Trim your nails and push back your cuticles but don't cut them. Do not use lotions or oils on your hands before you start, it may make the dry time longer.
 If using a white polish, start by applying one or two coats. Just a quick tip, to help make your nails dry faster put your hands in cold water or let cold water run on them in your sink. The cold water will harden the polish faster.
 Apply a coat or two of your mint polish. I used my dotting tool to clean up from of the polish on my skin wile it was still wet... I was being extra messy this time.
 With your glitter polish apply a line along the tip of your nails.
  Dab some of the glitter polish on your sponge. I am using a makeup sponge, you can get these at most store and they are pretty cheap for a large pack.
 Start apply the glitter from the sponge at the tip of your nails and go down making it fade.
 Apply your top coat and you are done!

Thanks for stopping by!

Check out my current giveaway ending on the 28th!
 Check out my current sale on my new site, $7.00 off these earrings right now!
And get a text alert for this cute set valued at $110 starting at only $18 on tophatter!


Monday, September 17, 2012

Three years today.

Today is the 3 year anniversary for my Rob and I. 
Three years ago today Rob told me he wanted to be my boyfriend after almost a month of courting... Yes, he actually courted me... or maybe he was being shy. Either way I will never forget that night, he was so sweet, and caring. Especially after he also rocked a table with about 5 full pints of beer that went all over me and my new dress! 

I am so happy I have him as a friend and my love, my life would be boring without him.
He is a hoot!


Saturday, September 15, 2012

Galaxy Nail Art Inspired Jewelry Makeover

Galaxy Nail Art Inspired Ring Makeover
I was cleaning out my jewelry box the other day and I found these old plastic rings I bought at the mall many years ago, I think I bought the at a Hot Topic when I was a little more on the goth side. I didn't want to throw them out because I still think they looked pretty neat but they were a little boring all black.

I was going to do an ombre fading something on them with bright colors but since there is so much room on them & since I'm kinda a huge nerd obsessed with Star Trek I thought I do a "galaxy" design instead.

If you want to give it a shot with some old jewelry of yours this is what you'll need:

Color polish & glitter polish or paint & glitter- I like polish because it drys fast and drys glossy. 

Sponge- I use just a makeup sponge.

Toothpick or nail art tool- For the stars.

Paper towel or a place to make a mess. 

To start with if the piece is dark color or depending on the polish you are using you may want to apply a white polish or paint to the base to make your colors pop.
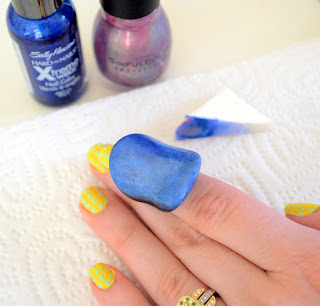
Apply your white and then base color.
Apply your other colors without completely covering your base colors, you want the different colors to show. 
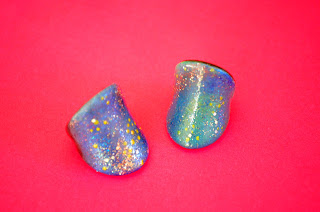
I would recommend using yellows and pinks too. For the first ring I did I stopped with the blue and some purple, I think the second ring I did with more colors came out much better.
Apply your glitter polishes.
 I used a fine glitter all over and two other glitters with a mix of sizes for a more dramatic look of stars.
I used a small dotting tool for my stars.
With your dotting tool or toothpick pick up some polish and start making some stars!
  Set the ring to dry. You can sponge on some clear polish or a sealer if you want. I like glossy so I dabbed on some clear polish, it also helped make the color pop.
I like how both rings turned out but I really love the colors in the second ring.
Done and done! 

If you liked this post check out my tutorial for an ombre inspired picture frame also painted with nail polish!
 And if you liked my nails check out my simple polka dot tutorial.

Thanks of stopping by, hope you enjoyed!

Stop by facebook to enter my giveaway to win a cute little ring!
 

Very Enchanting's September Giveaway!

Become a fan on facebook and follow me on bloglovin to be entered to win one of these pretty rings for September's giveaway!

Giveaway ends on the on the 28th.
Visit facebook for more information on the ring & visit my online shop for for pictures of the rings.

Good luck to all who enter!


Dotting Your Nails With a Nail Art Tool Tutorial.

Dotting your nails tutorial.
Here's what you'll need: A top coat (I use Rimmel Base and Top Coat), base color, color for you dots, & a dotting tool. You can use a toothpick, the very tip of your polish brush if its round or a pen if you don't have a dotting tool. 

First, prep for your manicure, to make it last longer. Remove your old polish, if any, and soak your hands in warm water for a few minutes. Trim your nails and push back your cuticles but don't cut them. Do not use lotions or oils on your hands before you start, it may make the dry time longer.
Start by applying a coat or two of the base color, I used 2 coats of the yellow I use.
Drip some of your dot color on a paper towel or something you don't mind having getting polish on, I used a piece of tape. I am using the largest dotting tool I have, if I was doing darker colors I would have done smaller.
Start at the center and made a few dots, finish off the sides in whatever pattern you'd like. I went with just lines of dots.
Apply a coat or two of your top coat.
And you're done!

Become a fan on facebook and follow me on bloglovin to be entered to win one of these pretty rings for September's giveaway!

Thanks for looking!