Tuesday, October 30, 2012

Very Enchanting's November Giveaway- Updated

~~~~~~Updated 11/10~~~~~~
Voting is over and the most voted goodie is the flower necklace! 

Enter to win on facebook.
Giveaway ends 11/20
Also, if I reach 100 followers on Bloglovin.com I will do two giveaway's this month for the top two voted goodies, second top voted item was the

 I am still going to do the refer a friend entry on facebook too so there will be a chance for 4 winners this month. 
 
 Thanks for voting and good luck!
  Feel free to ask any questions needed below!
~~~~~~Updated 11/10~~~~~~
Since the holiday's are just around the corner I am going to do November's giveaway a little earlier so I am starting the voting now.
The prize will come gift wrapped in case you'd like to give it as a gift or if you'd like just pretend that you don't know what's inside for a little treat for yourself.
Giveaway will be done on facebook.
Voting will end on the 9th, giveaway will start on the 10th and end on the 20th!
Vote & follow at the bottom of this page!

Follow this blog on bloglovin to help me reach 100 followers by the end of November's giveaway for a chance of a second giveaway!

Follow Very Enchanting

You can vote once a day.

What goodie would you like a chance of winning?
  

Share this post on twitter!

Thursday, October 25, 2012

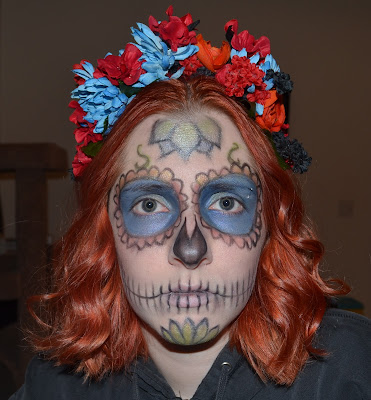
Dia De Los Muertos Makeup

I worked a few events at MoLAA in Long Beach Ca a few years back. I remember doing a Frida inspired event near Halloween in I think 2003, there was fun music, great people, fantastic art, awesome outfits and colorful makeup, plus some very yummy food. Over all it was a pretty good time and so much better than hoochie Halloween. I don't mind hoochie Halloween but there is always a lack of creativity. So in honor of the good times I've had I am doing a sugar skull/day of the dead look this year for Halloween. I also wanted to have my little sister do the same since her father is from Mexico and I wanted to teach her all about it but Halloween is on a weekday and she has school so that is a no go... My fiance also was talking about having an adult (drinking) Halloween too so no kids.
See how I made the headband here.
This is my practice/grumpy look. 
I will be doing a web on my forehead and make my mouth smaller so I can add more flowers and swirls.  I also don't have my lashes on, lacking color and didn't add the crystals around my eyes. I also sadly did not put the cap on my liquid eye liner last time I used it so it was all dry. I will have darker lines and more detail once I get a new one.

I posted a few pictures to help you if you are thinking about doing this look.
 To start with you will need a face, I went with mine since it was the only one around. 
I am a very pale person so for this look I just added some extra concealer and face powder. I also put concealer on my lips.
Using a pencil (I suggested not using black) circle your eyes and draw your decorations. 
You can black out your eyes or use color, I like a more colorful look.
You can use makeup like I have or any kind of face paint. You also may want to paint your face white.
Add your lashes, crystals, headband/flowers & whatever else you want.
Done and done.

 Happy Halloween!

Dia De Los Muertos Hairband

I am going to be a Day of the Dead look/sugar skull for Halloween this year. I looked for large rose hair clips but couldn't fine any so I made my own headband.

View how I did the makeup here.

I practiced doing my makeup today after making the headband :)
I went to Micheal's to get some roses but since they had a million things I decided to a few different flowers. Red roses with red hair seemed a little boring too.
You will need a glue gun, flowers, scissors or wire cutters, & a headband.
Take the flowers and leave off the steams before starting.
If you are using a plastic band like I am you will need to kinda wrap the band in leaves so the flowers don't fall off when the glue cools.
After gluing on a leaf or two start adding your flowers.
Glue smaller flowers under too for more volume.
Glue some of the smaller leaves to the bottom to help keep everything in place and so you can add more flowers.
Continue added flowers to the top and leaves under the band.
After you have enough volume start placing the larger flowers and any fancy stuff you have and want seen.
Wrap a leaf the ends when you are done and you are done!
Almost... you also need to clean up.
Boom, pretty!
And with makeup.
And without weird lighting in my room.

Hope you enjoy, thanks for stopping by!
Happy Halloween!

Roasted Pumpkin Seeds from Carved Pumpkins

My sister and I carved some pumpkins this past weekend, she wanted to take hers home to put by the front door and I really just wanted the seeds... because they are so yummy!
Xena and her 3 skull pumpkin!

The yummy seeds from our pumpkins.

If you feel like making some yourself they are super easy to make!

1. Rinse pumpkin seeds under cold water and pick out the pulp and strings. (This is easiest just after you've removed the seeds from the pumpkin, before the pulp has dried.)
2. Place the pumpkin seeds in a single layer on a baking sheet & coat with non-stick cooking spray.
3. Sprinkle with sea salt (or whatever seasoning you like on your seeds) and bake at 325 degrees F until toasted, about 25 minutes, checking and stirring after 10 minutes so they brown on both sides.
4. Let cool and store in an air-tight container.

Happy Halloween and happy cooking!


My first Julep Box.

I have seen a few boxed goodie offers here and there and after many months of thinking about joining one I decided to give it a try when I found the Julep Maven box.  I'd been meaning to try there polish anyway since a friend talked so highly of it. I joined but didn't sign up for my box, I wanted to check out their colors and maybe read a review or two but then I forgot to look up those thing and to sign up for the box. A few weeks later I got an email about their suede colors and an offer I could not pass up!

I took their quiz and found out that I am a classic with a twist.
The word "classic" threw me off but I was pleasantly surprise at how much I liked the colors and the bit of fashion shown for us twisty classics. After liking what I saw I signed up for my box and paid only $4, thank you very much email offer!    
On Saturday my brother who told me that I can a box on my patio and brought it in. I thought the box wasn't going to come till after the 27th but I guess your first box is shipped out right when you order it. My brother and sister were staying over for my sisters unbirthday, she turned 14 but her birthday was on a school day so we had it over the weekend so I could see her. Anyway, I couldn't play with it because family was over but today I cracked that baby open and look what I got!
Jodie, Sophie and The Best Pedi Creme Ever!
I am a fan of both color I got in the box. I couldn't decided witch to try first so I just went with both and they look pretty good together. I really like how beige/grey colors look next to my skin so Sophie is my favorite from this box.
Visit my blog post here to see how I made such clean lines.
My elbows get a little dry so I have been using the creme them, after just a few days they are very soft. I'm not gonna lie, I am not a huge fan of the smell. After a few minutes of it being on it smells lovely but when you first apply it the smell punches you in the face!

Overall I am very happy with my first box and I am very exited about my next. I don't know if I will like the colors as much but I can't wait to get the matte top coat polish I have as an add on.

Become a Julep Maven too! 
Over $40 worth of the hottest trends.
 What's your style? 
Use the code "PENNY" to get the same discount I did on my first box.

Monday, October 22, 2012

How to add holes to your lovely beetle wings.

I have been using beetle wings for my jewelry since I was given a very lovely necklace made by a coworker's daughter about 8 years ago. At that time I had seen a few different type of bugs set in resin in a few different places but nothing that had just the wings.
I started buying jewelry with the wings and took it apart so I can use the wings for other things. That was not cheap but at it was all I could do, I could not find the wings by themselves. After about a year of doing that I found a place in Los Angles while picking up some supplies for the jewelry shop I worked for that had just the wings! I was so happy and it was loads cheaper than what I had been doing before.

The wings were not drilled like the ones I was using from the already made jewelry so I had to find out how to add holes to the wings.While trying to find a way to do it I maybe ruined only 2. Its overall pretty easy.

I started selling just the wings on my etsy supply shop and have been asked many times how drill the wings so here is a few ways of doing it.

You can use a drill press.
Use the a drill size that fits your craft need.
Flip the wings over so you are drilling on brown side of the wing and press down.

You can use an exacto knife.
This is my favorite way of doing it.
Flip the wing over and start to twist the knife slowly and firmly in a circle pressing down little by little as you twist so the hole gets bigger as you go. Stop when you have reached the size you are happy with.

You can use a needle.
This is the slowest way of doing it, I personally have not tried it this way but I have seen it done and the hold are nice and clean. 
You will need to boil your wings for a moment in water and then poke the wing with a needle. You can roll the needle to make the hold bigger.
 One of my first beetle creations :)
These gorgeous, iridescent wings are shed from jewel beetles.
 The beetles have a short life span of only 3-4 weeks, and the wings are only collected after then. 
 Wing sizes average around 1-1/4 inch long by 3/8 inch wide, some wings may be longer or shorter but not by much.They are slightly stronger then a finger nail.
 I love the wings as earrings, they look great with my red hair too!

You can click on the pictures to see more pictures or to buy.
You can also find links to my etsy supply store and my jewelry store at VeryEnchanting.com

Thanks for looking!


Thursday, October 18, 2012

Make your own Halloween inspired wreath for under $10!

I have seen a few really cute Halloween wreath posted here and there and decided I wanted to make my own. I must say this wreath did not turn out the way I wanted. It looks fine and I am happy to have something on my door but this is not how I wanted to do it. For the first time ever my fiance Rob decided that he wanted to "help" me make something. I thought it was so sweet that I could not say no.

The few I've seen.

What you will need. 
a wreath
a few spooky plastic toys 
a glue gun
& spray paint if you are not happy with the color of the toy

Paint your toys whatever color you want. I spray painted my bats 2 nights before.
I got the glow in the dark bats at Target, it was $1 for each pack I grabbed 3 packs. I used two packs of bats on the wreath.
Rob wanted me to leave the bats as is, I did a light spray so they still glow but I got my black bats.
 This is the wreath I found at Micheals for $4, I thought it was a nice size. 
I wanted to paint it black but Rob thought it would be spookier if we left it as is... I still want to paint it black.
 Glue your toys on and that's it, you are done! 
I was going to add some small black flowers around it but Rob also though that would be lame.
 That is Smee, I have had that skull since I was in high school. I know Smee didn't have an eye patch but I did named him after Smee from Hook!
 Done and done, hang that bad boy up!
 This is Rob eating his egg sandwich while "helping" me. I don't know why he has a fork for a sandwich.
 I asked him if it looked good and this is him saying yes.
Then he got very excited because both of our cats jumped in the basket and told me to take a picture.
That is Athena and Artemis, the cutest little sister kitties ever!
Watch Artemis playing fetch!

Halloween inspired spiderweb nails!

Hope you enjoyed, 
Happy Halloween!

Check out my giveaway!