Showing posts sorted by relevance for query giveaway. Sort by date Show all posts

Wednesday, September 26, 2012

Minty Glittery Gradient Nails


I am a huge fan of pink and greens together and have been neglecting one of my favorite polish colors, Sally Hansen Mint Sorbet color. It chips within a week but I change my polish 1-3 times a week anyway so I don't mind, plus it's only $2 a bottle.

Here's what you'll need: A top coat (I use Rimmel Base and Top Coat), a minty color, glitter polish, & a sponge. You can use a white polish as your base to help make you minty color pop if needed.
First, prep for your manicure, to make it last longer. Remove your old polish, if any, and soak your hands in warm water for a few minutes. Trim your nails and push back your cuticles but don't cut them. Do not use lotions or oils on your hands before you start, it may make the dry time longer.
 If using a white polish, start by applying one or two coats. Just a quick tip, to help make your nails dry faster put your hands in cold water or let cold water run on them in your sink. The cold water will harden the polish faster.
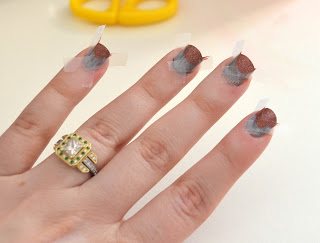
 Apply a coat or two of your mint polish. I used my dotting tool to clean up from of the polish on my skin wile it was still wet... I was being extra messy this time.
 With your glitter polish apply a line along the tip of your nails.
  Dab some of the glitter polish on your sponge. I am using a makeup sponge, you can get these at most store and they are pretty cheap for a large pack.
 Start apply the glitter from the sponge at the tip of your nails and go down making it fade.
 Apply your top coat and you are done!

Thanks for stopping by!

Check out my current giveaway ending on the 28th!
 Check out my current sale on my new site, $7.00 off these earrings right now!
And get a text alert for this cute set valued at $110 starting at only $18 on tophatter!


Friday, November 2, 2012

November Julep Maven Suede Polish Box.

My November Julep Maven box has come!
Matte suede polish!
 I thought it wasn't going to come till this weekend but when I opened my door this morning there was a little black box with my name on it.
The goodies! 
This box was a lot cuter then my intro box, came with extra goodies too.
 Brit, Minka, 3 Polish Remover Pads and Body Frosting.
 My intro box didn't have the pads, it was nice to just whip off my old polish right when I opened the box and start to play with the new colors. Sadly, my matte top coat add on to was just shipped so it didn't come in the box.
The body frosting is a very lovely treat and I think when this runs out I will be buying more & it may be a Christmas gift for a couple people. It smells like sherbet!
 The back of the it made me smile too:)
To do your nails like mine, apply a base color (I used Brit) after your base color dies make a X with tape on your nails leaving a triangle at the tip. Paint the triangle with your feature color (I used Minka) and apply your crystals then top coat.
 To see a step by step tutorial and to see how I add the crystals check out my older post here.
The top picture is of the matte suede polish with no top coat and this picture is with a good ol' glossy top coat. I really like the Brit with the matte look and can't wait to get the top coat so it last longer but I do like the Minka better glossy.
So this was box 2 for me, so far pretty happy. I love the holidays so I am happy to see next month's box!

Become a Julep Maven too! 
Over $40 worth of the hottest trends.
 What's your style? 
Use the code "PENNY" to get the same discount I did on my first box.
Coupon code "SEASON20" is valid through Monday, December 31, 2012 and will get you 20% off and free shipping if you don't want to sign up for a box or the monthly boxes.

Check out my current giveaway!


Wednesday, January 13, 2010

Become a fan on Facebook for discounts and a monthly giveaway!


Become a fan for weekly promo codes for free and discounted goodies!

Click on the picture to go to my facebook page!

Thursday, October 18, 2012

Make your own Halloween inspired wreath for under $10!

I have seen a few really cute Halloween wreath posted here and there and decided I wanted to make my own. I must say this wreath did not turn out the way I wanted. It looks fine and I am happy to have something on my door but this is not how I wanted to do it. For the first time ever my fiance Rob decided that he wanted to "help" me make something. I thought it was so sweet that I could not say no.

The few I've seen.

What you will need. 
a wreath
a few spooky plastic toys 
a glue gun
& spray paint if you are not happy with the color of the toy

Paint your toys whatever color you want. I spray painted my bats 2 nights before.
I got the glow in the dark bats at Target, it was $1 for each pack I grabbed 3 packs. I used two packs of bats on the wreath.
Rob wanted me to leave the bats as is, I did a light spray so they still glow but I got my black bats.
 This is the wreath I found at Micheals for $4, I thought it was a nice size. 
I wanted to paint it black but Rob thought it would be spookier if we left it as is... I still want to paint it black.
 Glue your toys on and that's it, you are done! 
I was going to add some small black flowers around it but Rob also though that would be lame.
 That is Smee, I have had that skull since I was in high school. I know Smee didn't have an eye patch but I did named him after Smee from Hook!
 Done and done, hang that bad boy up!
 This is Rob eating his egg sandwich while "helping" me. I don't know why he has a fork for a sandwich.
 I asked him if it looked good and this is him saying yes.
Then he got very excited because both of our cats jumped in the basket and told me to take a picture.
That is Athena and Artemis, the cutest little sister kitties ever!
Watch Artemis playing fetch!

Halloween inspired spiderweb nails!

Hope you enjoyed, 
Happy Halloween!

Check out my giveaway!

Thursday, February 7, 2013

My first glam bag from Ipsy!

I decided to join buy myself an Ipsy bag last month for my birthday, I saw a friend post what she got in December and wanted it all! 
 This is what came in the January bag!
 
Nailtini Frappe Polish- I am not a fan of nudes but I love this color, it fits my skin tone perfectly. It is a little sheer though so I have to use 4 coats, it actually isn't that much polish with 4 coats on it though because it is pretty thin. Maybe its because there is vodka in it. I did get another bottle of this already.
Josie Maran 100% Pure Argan Oil- I've used it on my scale a few times before bed since I have dandruff and it is doing a nice job, I don't know if I'd buy more but I like it so far.
Pacifica Tuscan Blood Orange Mini Body Butter- I love this and I will be buying more when it is gone, it is such a lovely smell and every time I wear my guy comments on how nice I smell :)
Sexy Hair Spray & Play Volumizing Hairspray- I don't use too much product in my hair, I had curly hair when I was a kid so when I curl it it keeps well even in moist weather. I am saving it for when I want big hair.
&
SOHO Concealer Brush (Crease brush & eyeliner brush where in the other bags.)- I have yet to use this also just because when I was on vacation last month I left my makeup at my my future mother in law's and had to get a few so I just bought one. I am saving this for a raining day though.
I originally signed up for it just for a birthday gift and was not planning on doing it after but I loved what I got and loved what I saw others getting before I joined so I am staying. The fact that is is only $10 really made the decision for though, I figured if there isn't anything I like in the bag I have little gifts to giveaway to family, friends and maybe even a random lady that need hair spray. 
The price for this month has gone up though or not so much price but California and a few other places are making them charge tax so February's bag was 80 cents more, still not bad for what you are getting.

 Another great thing about Ipsy is they what to see you use and love what you get! 
You get a profile on their site that you can add your "looks" to and if you are a youtuber you can add your tutorials and reviews right to your looks.
They also have monthly challenges, all of these goodies where up for grab if you had the right looks.
UPDATED- MY PRIZE IS HERE!- UPDATED

 I joined the Nailtini challenge with this picture and won,
first bag, first challenge and I an a winner!
I guess I will be getting the Nailtini 5 piece set from the picture. I am super excited about it and was so jazzed to see the "loves" my look was getting. I think my fiance was tired of hearing about it though but he was happy for when I won. 
My only beef with the site and challenges is people can post any look they want and find online, it does not have to be done by you or even with the brand the challenge is for. I just think it takes away some fun of seeing what other can and are doing.
Anyway, The February boxes are almost ready and will be shipping out soon if they have not started already!
I can't wait for this coming month's bag, everything looks so neat!
 
 FEBRUARY GLAM BAG SNEAK PEEK #1: Custom palettes will have you gorgeous and glowing.  

FEBRUARY GLAM BAG SNEAK PEEK #2: A silky and smooth start to your perfect Look. http://mygl.am/OfficialFebruaryGlamBagSneakPeek2

FEBRUARY GLAM BAG SNEAK PEEK #3: Go from glam to ultra glam with this red carpet-ready liner. http://mygl.am/OfficialFebruaryGlamBagSneakPeek3
FEBRUARY GLAM BAG SNEAK PEEK #4: Pump, plump, pop for lash perfection. http://mygl.am/OfficialFebruaryGlanBagSneakPeek4
 FEBRUARY GLAM BAG SNEAK PEEK #5: Fight the fall out with this helpful tool. http://mygl.am/OfficialFebruaryGlamBagSneakPeek5

I thought they would be doing eyelash goodies since a few of there latest post were lash related.
Including this, which are your favorites?

Join me on ipsy and subscribe to the Glam Bag! 
You get 4-5 beauty products every month delivered to your door, for just $10. Michelle Phan curates the bags! 
It is a cute bag, I highly recommend it. 


Thanks for stopping by!


Thursday, May 9, 2013

Fit. Clear. Tan. Ellie Giveaway!

Enter now for your chance to win these goodies! 
I just found Cut and Blow, the destination that delivers everything Hair and Beauty - at private sale prices. Members discover new offerings daily - each available only for a short time. 


Thursday, May 17, 2012

New Earrings from Very Enchanting Jewelry.

My boyfriend is let for New York today and will be gone for just over a week. I got a few goodies to make pretties and keep myself busy while he wasn't home but while he was packing I made them a few of them yesterday... I started with the bubble earrings but just went crazy and made to all the earrings I was going to make over the week!

I have a few bracelets and necklace in mind to keep me busy though. I'm also going to rearrange my bedroom and clean up my office... not looking forward to that at all.

These earrings are very very easy to make but can be harder depending on how much handmade you want them. If you want to make your flat back beads like I do with some of mine you'll need to make a mold (I do silicon) or buy a mold you like. You'll need to get resin and follow whatever steps you have for making the beads, this can take up to 48 hrs for the resin to be ready. You can also just buy some flat back beads from a craft stores or sites. You will be your flat back beads, earring post, earrings backs and jeweler's glue.
 Place a little glue on the back of the bead and then place you post on the glue. Hold the post in place for a moment then set it aside to dry for however long the glue says, I always leave them alone for about 24 hours even if the glue says 10 minutes. After they are all dry they are ready to wear so add on the earrings backs and you are good to go!
Bubbles! These guys are what started it. I wanted to see how they would turn out then just kept making them. They turned out way better then what I though. The posts I used make the color pop more, I was scared that the would be very visible and take away from the bubbles. 
These ones are definitely my favorite of these little button earrings. 
Foiled acrylic neon diamond zebra print stud earrings.
I love the green ones so I made a pair for myself :)
Colorful flowers, I make these before and gave them out as gifts during Christmas to a few kids I know and sent an orange pair to my aunt. She loved them!
A bouquet of earrings!
Dino Earrings, these little buddies were once buttons and now are too cute and ready to be worn by and dinosaur lover!
T-Rex yeah! I'm on the look out for some raptors to go with these guys because raptors are the best!

Thanks for stopping by, feel free to shop by my etsy shop to see more of my goodies and more pictures of what I have posted here!


& check out my blog giveaway going on now!